Sunday 29 December 2013

Boots Sale Haul

Merry Belated Christmas and Happy New Year everyone! I hope you have all had wonderful times, not worked to hard, eaten lots and been merry! 

Today I just wanted to do a post, as I haven't done one for a while, about my great bargains I bought in Boots! So for anyone who doesn't know Boots is one of my favourite shops and I LOVE LOVE LOVE their christmas sale! So I went there and had a look around and I grabbed myself some AMAZING bargains! 


I bought the soap and glory 'Bag' which was ment to be £35 but everything was half price so it cost £17.50. A Mark Hill brunette hair set which was ment to be £10 but was £5. A Charles Worthington textured updo kit £12 for £6 and a vintage trinket pot which was £8 and I got it for £4. One of the best things about Boots is all year round you get points with your purchases so I only paid £21.50 for everything! 

So in the soap and glory bag this is what I received....


From left to right 125ml of Endless Glove, I have not used this before so it will be nice to try a new hand cream out! This hand cream can be used as a regular hand cream or an overnight hand mask with gloves when applied generously! It smells beautiful, all the products in this set have a very similar scent which they describe as 'notes of frozen yuzu, orange oil, green fig and jungle pomelo essence' I don't actually know what most of that is but I can tell you it smells nice! The only thing that would have made this better would have been a pair of cotton gloves to use with the mask.

Next is 500 ml of Foam Call I have used this before it is a shower come bath body wash. I really like this product again the scent is delicious it's really bubbly and leaves your skin feeling very soft!

500ml of butter yourself with a pump. I really hope the pump is good as when a pump works well it's one of the best things, it makes applying the moisturiser much easier, but when the product is too thick or the pump breaks it becomes a useless nightmare! I have not used this product before so I will have to see what it is like but I have 100% faith in soap and glory products so I think it will be amazing!

250ml of Pulp Friction which is a body scrub, again I have not used this before so I'll have to try it out and last but not least a shower cap! I love shower caps they make a quick shower so much easier for someone with long hair! This shower cap is also pretty glam so you could definitely open the door to the postman in it! 

And of course it all came in a big zip up vanity case which I am sure I will use a lot!


So far my favourite thing I bought has to be the Charles Worthington textured up do kit.


As you most probably already know I am a massive fan of a bun, especially with a bun ring. They are super quick, super easy and most importantly super glam!

This kit came with a small bun, which I needed as I only had a large bun ring and some brush out strong hold hair spray. Now both of these things are good but the pink can.... The volume and bounce texturising spray is something else!!! It says it give a back comb effect, height texture and volume and that it is non greasy! It is all of these things and much much more! It is amazing! It gives my hair such an amazing feel and volume and texture! It's as though my hair doubles in size but in the right kind of way! It's just amazing. I will 100% buy this product again! I will try and do a post with a step by step guide on how to achieve the look with these products so you can see how much it transforms my hair!

One of the reasons I love buying these kits is you get the chance to try products you never normally would buy or use. I would have never bought a spray like this as it's not anything I thought I would have needed and I would think I could achieve this with normal hair spray. But the fact is I can't and I wouldn't have been able to do it!

And finally I bought the Mark Hill brunette hair kit.


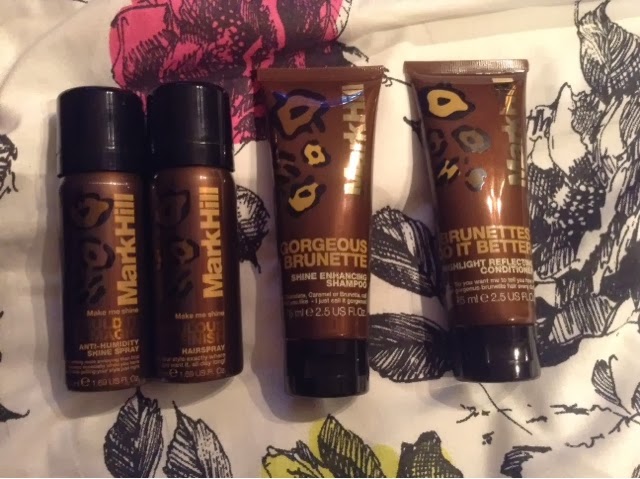
This came with shampoo, conditioner, anti-humidity shine spray and hairspray. I haven't used any of these products yet but I will be taking them to my boyfriends to stay there so I am not caught short when we decide to do something last minute with messy hair! 

If you have tried any of there products befor then let me know what u think of them, or if you got any super sale bargains let me know what you got and what you thought of them!

Happy new year! Peace out!

X

Friday 15 November 2013

Nude Nails with Christmasy Black Sparkly Tips

So today I have decided to do a sort of step by step how I did my nails like this guide! 
So as you can see my natural nails are very stained because I wear nail varnish pretty much 100% of the time! Nearly all of the time I use base coat but on this one occasion I didn't and my nails got stained! So always wear base coat! So I started by shaping my nails with a very fine nail file as they only needed a touch up they didn't need to much re shaping or re sizing.


Next I gave my nails a gentle buff with a buffer block I got really cheap from superdrug and then applied my base coat. My most recent base coat is Sally Hansen miracle nail thickener, I don't think it does what it says it does but it is strong and if your just wearing the base cost it's nice and shiny, I would probably buy it again but not to thicken my nails! It's the one with the purple bottle and gold lid!

Next I applied one quite tick coat of miss sporty in a nude shade. It is number 24 it's one I have blogged about before, I really like it and 100% recommend it if you on a budget!


Once that had dried I followed the shape of my nails edge and painted it black, this was actually a massive pain in the arse as both of my black nail varnishes I've had for ages and ages and ages and they were both really thick and hard to work with but I'm sure if you had a thinner nail varnish that you would find the task of following the shape of your nails very easy! Before you do this you could tape up the sides of your nails as it gets very messy escically when you paint your hand your not so good at. I think taping up your nails is a complete waste of time and once your nails are 100% dry just soak them in some warm water for 5 minuets and give them a gentle brush with a nail brush or at the end of a bath or shower and all the varnish on your fingers will be gone!


Once the black was dry you could just stop there as they look really nice. I applied one layer of top coat before I went on to the next stage, as I wanted something a bit more glittery and special! So I used the BarryM special effects limited addition glitter that I got a couple of years ago in a sale, it's still going strong, and applied that to the very edge of my nails!


So once the glitter had dryed, I put on two coats, I applied another layer of top coat. Seche Vite is my favourite glossy top coat I have ever come across in my whole life, no exaggeration! It makes any nail varnish I apply stay on for a week plus and I'm convinced it's the only reason my nails are so long. As you can see it's really messy around the edge of my nails where I've been a bit heavy handed.


So as I said earlier I just waited till all my nail varnish was dry, Seche Vite makes it touch dry really fast but it's not really 100% dry on the lower coats so I waited a couple of hours then soaked my nails for a couple of minuets rubbed them with the nail brush and here is the final result! 

 
I hope you have enjoyed this, if you try it out then you should send me a picture! Don't forget to follow my blog. I'll have lots of Christmas sparkly nail designs coming up and some product reviews on my current skin care and just lots of other bits and bobs really! 

X

Wednesday 6 November 2013

October Update

So after the busy month of September October was almost as busy! I decided to really start a full on diet when October started as I'm going away next summer and I just know with stuff like Halloween, fireworks and Christmas I'm going to put on weight so I've started early to hopefully kick it off in the right direction! When I've lost weight before I found the best diet that works for me is Rosemary Conley so I haven't gone back to any classes but I'm following the diet, I think in the new year I'll go back to the classes to kick start the post Christmas weight loss! If anyone is interested then the link is here to the website.


I went to the O2 arena to see Bruno Mars! I was so excited as I love Bruno and I had never been to the O2 before! So that was so much fun! I honestly think that Bruno was better live than the recorded stuff! He was so amazing! While I was there I also had my first ever GBK experience! It was amazing! (So amazing I'v  been twice since) everyone is allowed a not so strict day when dieting, I mean it is a lifestyle change not something for a couple of weeks and you can't go your whole life never eating a burger or curry again!?!?!? 

So back to a bit more of a normal post for me! I did a Halloween style manicure! I can't take the credit for this as one of my friends did it on her nails and posted it on Facebook and I had a go because I thought it was so cool! So here it is, black and white Beatlejuice style stripes with a ring finger Halloween face! And I posted it to Heat for the Halloween nails and got on there website which was super-duper cool! So as I'm a looser I screen shot it and here it is! 


I then had a week off work so I met up with some uni friends, went to stay at one of There's for a couple of days, then it was Halloween! So I got back on the fancy dress, carved my pumpkin and decorated the window for the trick or treaters! I carved a pumpkin of a face being sick! I wanted a pumpkin which was a bit lumpy and bumpy not like the supermarket pumpkins that are perfectly round so when I was seeing my friend in Kent we went to a farm shop that only sells local produce and got our pumpkins from there! There where so many it was hard to pick one!


I dressed up again for Halloween so I went as a broken doll! And here is also a picture or my cousin with me who went out as Batgirl! 


So that's October done with! I should now be back to some normal blog posts! I hope you have enjoyed my updates and I should be posting some more nail designs and Christmas ideas soon along with some new products I am currently loving!

X


September Issue

So I have been so busy in September I didn't have chance to blog at all! So I thought I would start with a September update! So firstly I left my old job and started a new one! Then it was my birthday! I had so much fun dressed up as a zombie for the Bournemouth summer ball I decided to have a zombie themed birthday party! It wasn't a special birthday I just haven't done anything for the last couple of years so I decided to have a party this year! So the 3 main things I was excited about for my party where...


1. My cake!!! 


It was red velvet cake and I used the jelly with evaporated milk to make the jelly brain to go on top and under the outer decorative icing I put lots of yummy chocolate icing!


2. The fancy dress!


My zombie costume 

I tried to go as a prom zombie... I just got a dress in the sale and ripped it and burnt it! the best thing about a zombie costume other than the fact it is so much fun is that it was also so cheap to make! All the decorations ans costume accessories I got where really really cheap! I got most of it from e-bay. If you want to know how I got my zombie look I already have a post here although this time I didnt use liquid latex, I made my own with equal parts of glycerin  powder gelatin and water mixed together in a bowl and microwave until it dissolves!

3. Skittles vodka! 

The skittles disolving

When I pick a theme for something I tend to get quite into it so I decorated my house and to be honest it looked a bit like Halloween had come early! Anyway I had a great party and there was great company and we really celebrated in zombie style!

Some Zombie Decorations
Next I went to Bestival! It's the third time I've been and if you haven't been before I would totally recommend it! It was amazing! As always!


Left Bollywood Field, Top Right The Port at Night, Bottom Right The Port 
Then I think it was the second weekend in October I participle in SwimBritain with my family! You get together with 3 other members and between you swim a distance doing relays racing the other teams to raise money for charity! We decided to pick variety a charity for children with disabilities! We swam the 2000m distance and I done it with 2 cousins and my Grandad! It was great fun a great way to bond with my family and a great way to raise money for charity! 

Our SwinBritain Team

Then at the end of September I had Basingstoke half marathon to do! It's the first time if ran a half marathon and it was really really hard! But I really really enjoyed it! I would 100% do it again (maybe not Basingstoke in a hurry as it's so hilly) I didn't get an amazing time but I completed it, I ran the whole distance and didn't stop once so I was really please with myself! I ran it with my Grandad and I can honestly say I couldn't have done it if it wasn't for him! He really kept me going! 

Us once we had completed the 13.2 miles

So this is pretty much why I was so quiet in the month of September! Now I've settled into my new job a bit more I should be posting much more regularly again! This isn't really a normal post for me but I just wanted to let everyone know I hadn't stopped posting I have just been soooooo busy! But I've pretty much settled down into normal life again now!

X


Sunday 18 August 2013

Black Pointy Nails, Louboutin Themed

Happy Sunday Everyone! 
So this is just a super quick post! I said I would post a pic of my black pointy nails in my last post Matte vs Glossy nails here so here it is!
 
As they are so long, yes they are my real nails with no acrylic or anything added, I have painted the underneath of them red and it reminded me of the Louboutin shoes! I just wanted to share the look with you really so here it is!
 
First I applied a Base coat then I used 2 coats of Rimmel 60 second black followed my the Rimmel matte Effect Top coat and then finally using my super shiny Seche Vite top coat on the tips in a French Manicure style!
 
 
Here is a close up of the red 'sole' of my nails! I used Barry M 262 Bright red and I used 2 coats.
 
 
And here it is again! I hope you like it! I would recommend trying not to get to much red on your skin when you pain the underside as I did and it is quite sore!
 
All of these colours lasted a week (that's right I couldn't believe it either) without chipping so I would recommend all these nail varnishes. I do think it has a lot to do with the 3 layers of top coat though!
 
 
Have a great Sunday!


Thursday 15 August 2013

Matt Vs Gloss Nail Effects

Sorry I haven't posted for a while! If been so busy with life and getting a new job that I haven't really done much with my nails (or anything else) that's really been worth posting about! 

So since my silence I have been growing my nails nice and they have really been growing! they are the longest i remember them being for a long time! I think they have been growing to we'll thanks to all of the sun and its vitamins D I also think its due to the long pointy shape as normally when I break a nail I break the edge of the nail off but at the mement they don't have have edges as they are in a point not square! 


So here is my matte vs gloss nails! I saw something like this in a magazine I think it might have been an advert but I can't remember, it was black with looked so cool and I tried it out but was so busy I didn't get chance to post a pic! So ill do another post with then black later!

 So here I have used the models own scented grape and then after 2 coats I applied another 2 coats of the Rimmel matte top coat I appled this to the whole of my nail. Once that is completely dry I used my seche vite quick dry super gloss top coat and apply it to the tips only just like a French manicure.


I hope you like this matte vs gloss look! I find it really good with keeping your nail tips strong as well, most probably due to the thick layer of nail varnish you have on your nail! 

I should start posting a bit more regular again so keep an eye out for more posts! 

Have a great day and thanks for looking! 

X


Wednesday 26 June 2013

Pointy Nails! NOTD

So I decided to go for a change from my normal square shaped nail! 
I don't really like the rounded nail shape on my nails and wanted to go for something a bit different! I have seen a lot of the 'Rihanna' style nails but I haven't seen it on real nails only acrylics.... But while at work the other day I accidentally broke a nail into this shape, which is ironically the worst shaped nail I have now, so I thought I would give it a go and give them all a re-shape! 

So here it is...


So here they are with the Leighton Denny nail polish in Embellish Me, this is the first time I have tryed this nail polish, my mum was given it as a gift and I tried it out, I love everything about it, the colour itself, the depth of colour, how pigmented it is and how well it stayed on my nail, I don't know where it is from or how much it cost but even if it was expensive I would 100% buy another one! 


If you have tried the Leighton Denny range out let me know what you think of some of the other colour available!


I think the pictured don't really do my nails justice for how long they are, but here they are with models own in fuzzy peach. If you want to re-create this look then I recommend taking nail clippers to the corners of your  nails then filling them one side at a time to create a point!


This is the nail polish I am wearing today! I re-shaped them from the original photos to give them even more of a point. To do this filled my nails right down to the bottom corners as there was a bit of re-growth. they seem to look a bit shorter even though I didn't take any off the length but they do look more pointed, here I am wearing models own in Jade Stone, I always bang on about this nail varnish as it is one of my favorites!

As i said before let me know if you try this out and what you think of the pointy nail look!

x

Wednesday 19 June 2013

Race For Life

Just a quick message to anyone who has done or will be doing race for life this year! I did it this evening, I done the 10k in 1hour 16 mins and I am so exhausted! It was a really hot evening and I really gave it my all! I trained for it and I'm also doing a half marathon! Doing this 10k has made me realise how much more seriously I need to take running! I think its time to cut down on all bad treats!

Thank you to all my friends and family who have supported me and sponsored me! And well done to everyone who will be or has done the race for life! It's for an amazing cause!

X

Tuesday 18 June 2013

Chalkboard Nails

 Today I have tried to create a Chalkboard nail effect! I saw it on the Caité website when I was researching for my review and nail of the day with their polish Kitten Heels.... I really liked the Idea of using the matte nail polish to create the chalk board look! so here is what I did and here is how it went!
 
 
I started by Using the Rimmel 60 seconds black nail polish in Black Out... I have to admit it does not dry in 60 seconds although that being said it is pretty old now and I did use 2 pretty thick coats as I wanted it really black! I do remember it drying faster when it was new and thinner!
 
 
Once the Black had dried I put some nail polish on a napkin and used the flat end of a pin to dot dots on to my nails, as I do not have a dotter! I often use a hair pin but I did this a couple of days before and it did not give the desired look I was after, it was too thick and a bit messy! The flat end of a pin, in my opinion, is much more successful! I then used a different colour nail polish and a different pattern of dots on each finger! I wiped the remaining nail polish off the pin end after each nail so I could re-use the same pin and not contaminate the colour! I waited about an hour between putting on the black and dotting on the dots, I had a lot of time to kill so an hour was convenient for me but you don't have to wait that long!
 
 
So for this look I used....
Barry M Matt White 66 on my thumb and did a dotted swirl
Models Own Grape Juice on my pointer finger with a dotted line
Models Own Jade Stone on my middle finger with half a arch
Barry M Gelly Grapefruit 311 on my ring finger in a dotted heart
Ciaté Ferris Wheel on my little finger with a C shape and a dot in the middle 
I chose these colours because most of them are a pastel or pale colour and I think this adds to the chalkboard effect!
 
 
Finally I painted the matte coat, Rimmel Matte Finish Mattifying Topcoat, I would recommend leaving as much time as possible between the application of the dots and the top coat as on a couple of my finger the polish bled into the black when I applied it. As for the nail polish on my shin, I don't use a cotton bud in nail polish remover as I always make a MASSIVE mess and smudge what I am doing! I just wait till Its bone dry then go at it with soap and water and a nail brush or it quite easily picks off the skin!
 
The first time I did this I made it a but more schooly with a division sign and a addition sign and I didn't use the dots, I just used solid lines.... it was more fun but it didn't look as good. I prefer the dotted look personally! Let me know what you think and if you like my posts then subscribe to my blog with Google plus!
 
X

Friday 14 June 2013

OOTD *New Shoes*

So here is my outfit of the day! Again it is all Topshop. I have some old light blue Kristen jeans on rolled up, with an oversized cream blouse with a pretty orange toile print, and my eagle necklace on! Iv then got an oversized almost tweedy black and white 80's cut blazer on just in case it gets cold! Then most importantly..... NEW SHOES!!!
 
Here are my new cut out boots in all there glory! I love the chunky silver buckles and I am really loving the cut out section! I love it because you can wear the pretty frill sock with them! I was going to go for an Orange pair to match my blouse but I am really not much of a matching person so I chose some dark green ones! These boots were £75 I really love how chunky they are! I am not really into all thin shoes, I like a bit of clump!
 
 
Finally I decided to pose like this as I see it on a lot of other blogs and OOTD's after doing this I quickly decided that I probably wont be doing it again in a hurry! But I did think it was funny so worth putting on this post!
 
If you like my blog please share it with your friends and fellow bloggers on Facebook ,Twitter or Google plus and if you really like it give me a follow!
Enjoy your weekend and remember it's fathers day on Sunday!
 
X

Thursday 13 June 2013

OOTD with Topshop June

Todays Outfit Of The DAY.......
 
As always with all of my clothes it is primarily Topshop! but I don't see anything wrong with that! Today I am rocking the casual look! I have got the day off work and need to go into town so nothing special!
Outfit Of The Day

 Iv got my hair up in a bun with a bun ring and a hair band around my head to control the fly-aways! Iv got a long sleeved oversized checked grey shirt on, which I think was around £36, over a white high roller neppy tank tee shirt (basically a speckled white roll sleeve tee) which I got last year for about £12. I am wearing the current Joni jeans, £36, in navy which I have rolled up and some black studded pumps from last year. everything here is from Topshop, some is new and some is old!


I know it looks quite cloudy but iv got my Topshop sunglasses on because its quite bright and iv been driving about so they have been ideal for this sunny one minuet and rainy the next weather! I got my sunglasses about two months ago from Topshop I think they were £16 and they came with a free cloth case. I was looking for some round sunglasses when I got these. I really like them because there a bit different, I feel a bit like Willy Wonka in them and they have the blue 'arms'. 
 
 
 Here is just a close up of my polka dot head band, this is also from Topshop. Its really new and I think cost £6. The bow has wire in it so you can style it how you want and it is elasticated around the back of the head band so will fit most head sizes! I often find this type of headband slips so I use some small hair slides to keep it in place!
 
 
Here is a close up of my shoes, they are last years but im pretty sure there are similar ones around loads of places this year! to be honest I love the studded shoe look but I hate the feel of them! the studs dig into my feet and I can only wear them for an hour or two at a time so there good for driving as I am not actually on my feet and there good for popping to town ect... not long wear!
 
 
So this is my absolute favourite accessories at the moment! It cost more than I would normally pay for jewellery as I normally like to get jewellery in the sale as I often don't think its worth the price and I loose it! But this bald eagle Freedom necklace cost £14 and I just LOVE it!!! I have definitely got my moneys worth from it and iv only had it about a month. I know its not that much for a necklace but I never spend that much when it comes to accessories!
 
hope you like my look! let me know what you think
 
X
 

NOTD Ciaté in Kitten Heels and Review

Todays nail of the day is a nail varnish I got given as a gift from a friend who did a internship with this nail polish company! I had never heard of this product before so it was nice to try out something completely new! The Ciaté nail varnish bottle is very pretty, maybe one of the nicest bottles I have come across with the pretty bow on the bottle! It contains 13.5ml so you do get quite a lot of nail varnish. The bottle is also a nice curved shape! To buy this nail varnish off the Ciaté website it costs £9 which I think is quite expensive, but I think it is a really pretty colour and iv had it on for two days now and it has not chipped! That being said I am wearing my Seche Vite top coat so that could have helped!
 
 
The colour of this nail Varnish is really nice, it is red with a gold pearlescent highlight which shimmers in the light. Its it more clear in the pictures of the bottle but is also visible on the nail when you move in the light. I have applied two coats in this picture I think I could have applied a third coat to give it a slightly more opaque feel as I think it is very slightly transparent. I do really like this as I have already said, I have been wearing it as an everyday colour but I think that this colour is maybe a slightly more special colour, which I think ill save for if I go out somewhere nice or if I get a bit of a tan as I'm feeling very pale in this dreary British weather!
 
 
I do think that this nail varnish is slightly expensive but if I saw them in an offer I would definitely buy some! I have got 2 more colours to try so I will see how I get on with them and if I need to apply more than 2 coats. I would recommend this nail varnish if you saw I would say pick it up because even though its slightly transparent it is very bright! And I really really love the branding and bow on the bottle! For me branding and image of a product it very important and I like what I see here!


I had a look at the Ciaté nail varnish web site and twitter and they are based in London and they look to be quite a young fun company! They started the caviar manicure so they look to be quite a fun, young and upcoming, I would watch out for them as I think they have lots more fun things to come!
 
X

Sunday 9 June 2013

Fancy Dress!!! Zombie Costume

Today's post is a bit different from the normal nails and outfits! I don't know if iv mentioned before but I LOVE fancy dress and my pirate fancy dress is one of my more popular posts so I thought I'd show my zombie look! I hope you like it! if you want to see how I did any of this in more detail then just comment and ill upload some step by step guides! 

So last night I went to the Bournemouth Summer Ball and I went as a zombie!

Zombie in Night Wear!

 My costume is all homemade, including my make up and wounds! I was really cheap and easy and we really effective! I only spent about £15 which was £5 on face paint, £3 or £4 on liquid latex £3 on fake blood and £2 on the nightie from a charity shop!

  
Zombie Nails
I painted my nails to look like zombie nails, as though I had been digging through mud! I did this with a sponge I started with a pale green and sponged on red, brown and black! I did have the nail varnish all over my fingers for a more 'dirty' look but by the time I took this picture it had rubbed off my skin!

Cut Arm, Bullet Hole and Ripped Face
 All of the wounds I made with liquid latex which I found at a fancy dress shop, I stuck tissue onto my face and arm with the liquid latex then put another layer of the latex then tissue then a final layer of latex and once it dried pulled it apart with my fingers and tweezers then filled the middle in the red and black face paint and layered foundation, white face paint and brown eye shadow around the outside once it had settled I covered it in face blood. I would recommend applying a barrier cream or foundation to your skin before applying the liquid latex as when I removed mine some patches of skin have been slightly irritated and I now have red patches on my face and arm! 

Zombie in Zombie Coat

For the night dress and coat I mixed some mud with water and rubbed it on to them, I cut half the arm off my old coat which iv had sat around for ages even though I don't wear because the zip is broken and I cant bare to throw it away!  

Dead Look
For my hair I just French plaited it the day before and took it out as the last thing, back combed it at the roots a bit and put on some hair spray!

I hope you like my costume and it inspires you to try out a zombie look because it is so easy and cheep! If you have enjoyed this then you might like to check out my Pirate look


X