Showing posts with label Barry M. Show all posts

Monday, 17 March 2014

Barry M NOTD

So I haven't posted for ages.... And I just did this snazzy little number the other day! It's a couple of different blue colours, mostly Barry M and I think one miss sporty! Used the a Barry M nail pen for the stripes!

Wednesday, 6 November 2013

October Update

So after the busy month of September October was almost as busy! I decided to really start a full on diet when October started as I'm going away next summer and I just know with stuff like Halloween, fireworks and Christmas I'm going to put on weight so I've started early to hopefully kick it off in the right direction! When I've lost weight before I found the best diet that works for me is Rosemary Conley so I haven't gone back to any classes but I'm following the diet, I think in the new year I'll go back to the classes to kick start the post Christmas weight loss! If anyone is interested then the link is here to the website.


I went to the O2 arena to see Bruno Mars! I was so excited as I love Bruno and I had never been to the O2 before! So that was so much fun! I honestly think that Bruno was better live than the recorded stuff! He was so amazing! While I was there I also had my first ever GBK experience! It was amazing! (So amazing I'v  been twice since) everyone is allowed a not so strict day when dieting, I mean it is a lifestyle change not something for a couple of weeks and you can't go your whole life never eating a burger or curry again!?!?!? 

So back to a bit more of a normal post for me! I did a Halloween style manicure! I can't take the credit for this as one of my friends did it on her nails and posted it on Facebook and I had a go because I thought it was so cool! So here it is, black and white Beatlejuice style stripes with a ring finger Halloween face! And I posted it to Heat for the Halloween nails and got on there website which was super-duper cool! So as I'm a looser I screen shot it and here it is! 


I then had a week off work so I met up with some uni friends, went to stay at one of There's for a couple of days, then it was Halloween! So I got back on the fancy dress, carved my pumpkin and decorated the window for the trick or treaters! I carved a pumpkin of a face being sick! I wanted a pumpkin which was a bit lumpy and bumpy not like the supermarket pumpkins that are perfectly round so when I was seeing my friend in Kent we went to a farm shop that only sells local produce and got our pumpkins from there! There where so many it was hard to pick one!


I dressed up again for Halloween so I went as a broken doll! And here is also a picture or my cousin with me who went out as Batgirl! 


So that's October done with! I should now be back to some normal blog posts! I hope you have enjoyed my updates and I should be posting some more nail designs and Christmas ideas soon along with some new products I am currently loving!

X


Sunday, 18 August 2013

Black Pointy Nails, Louboutin Themed

Happy Sunday Everyone! 
So this is just a super quick post! I said I would post a pic of my black pointy nails in my last post Matte vs Glossy nails here so here it is!
 
As they are so long, yes they are my real nails with no acrylic or anything added, I have painted the underneath of them red and it reminded me of the Louboutin shoes! I just wanted to share the look with you really so here it is!
 
First I applied a Base coat then I used 2 coats of Rimmel 60 second black followed my the Rimmel matte Effect Top coat and then finally using my super shiny Seche Vite top coat on the tips in a French Manicure style!
 
 
Here is a close up of the red 'sole' of my nails! I used Barry M 262 Bright red and I used 2 coats.
 
 
And here it is again! I hope you like it! I would recommend trying not to get to much red on your skin when you pain the underside as I did and it is quite sore!
 
All of these colours lasted a week (that's right I couldn't believe it either) without chipping so I would recommend all these nail varnishes. I do think it has a lot to do with the 3 layers of top coat though!
 
 
Have a great Sunday!
 
X 
 

Friday, 24 May 2013

Pink Half and Half Nails! How To...

This is just a really quick post on how I did this half and half nail look! Nice and simple and quick for the bank holiday weekend and nice and summery! You can do this with any two colours! Iv chosen two pinks as you can see!

To do this I started with the lightest colour my pale pink and painted the whole nail (models own scented), I useded the lightest colour first so that the bottom colour will not show through any of the too colour when you apply it! Once the bottom colour on the whole of the nail is touch dry carefully apply the second colour, in my case the dark pink (barry m gellies) starting at the edge of the nail in one long smooth stroke then working my way towards the center on the nail. If you are careful and rest your hand on a surface it is easy to keep the line straight and only paint it on half of the nail. Finish buy applying a top coat!

I hope you like this quick and easy look! Some other nice combos might be lilac and jade, blue and yellow or a brighter green and a darker grey! You could also put some glitter on one of the sides! Because I do love glitter!

Have a nice bank holiday weekend I know I will!

X

Friday, 26 April 2013

NOTD with Models Own scented

So since I tried out the models own scented Strawberry Tart Iv been wanting to get another one. I really like the look of the pastel purple in Grape Juice and have been lusting after it for ages now! Lucky for me pay day has arrived to today I went and picked it up! 

It smells amazing! I didn't think I'd say it but it smells even better than the Strawberry Tart! The smell reminds me of children's shampoo! I know its strange but its really nice.... I know deep down we all wish we could still use the shampoo out of the colourful bottles shaped like fish and splash about with them in the bath.... 

.... anyway back to the point! As always I find models own nail varnishes get better the longer you have them, you can't really tell because I have added a pretty spotty design (if I do say so myself) that even with 2 coats I found it quite translucent in places but this does not put me off as the varnishes tend to stay nice and thin in the bottles for a long time. 


I started by painting my nails with a base coat, then painted on 2 coats of the Grape Juice.Then for this design I just used a hair slide as I do not have a doter, although I should invest, to make a line of dots across my nail! It was really fast and only took a couple of minuets. I started with the Strawberry Tart by models own then for the second line used Barry M Gelly shine in Grapefruit 311.


I didn't use different sized 'doters' to do the different size dots, I just used the back of the hair slide at a slanty angle for the bigger dots so a larger surface area was covering my nail and I used just the tip for the smaller dots so a smaller surface area was touching the nail. I also only dipped once on the smaller dots and dipped into the colour every time for the larger dots.


To finish it off I applied a coat of my super fast drying super shine Seche Vite top coat! you can still 100% smell the grape scent through the top coat, although you can't small the strawberry as the Grape does overpower it but that is what I wanted!


Sorry about the slight mess around the edges of my nails it always look much worse in the photos than in real life! I hope you like this look and if you haven't yet I recommend you try the scented colours out! When I got these today they where on buy on get one half price in boots! I hope you have a nice weekend! Let me know if you try this or something similar out!

X

Thursday, 18 April 2013

Prom Nails Jade Models Own and Barry M

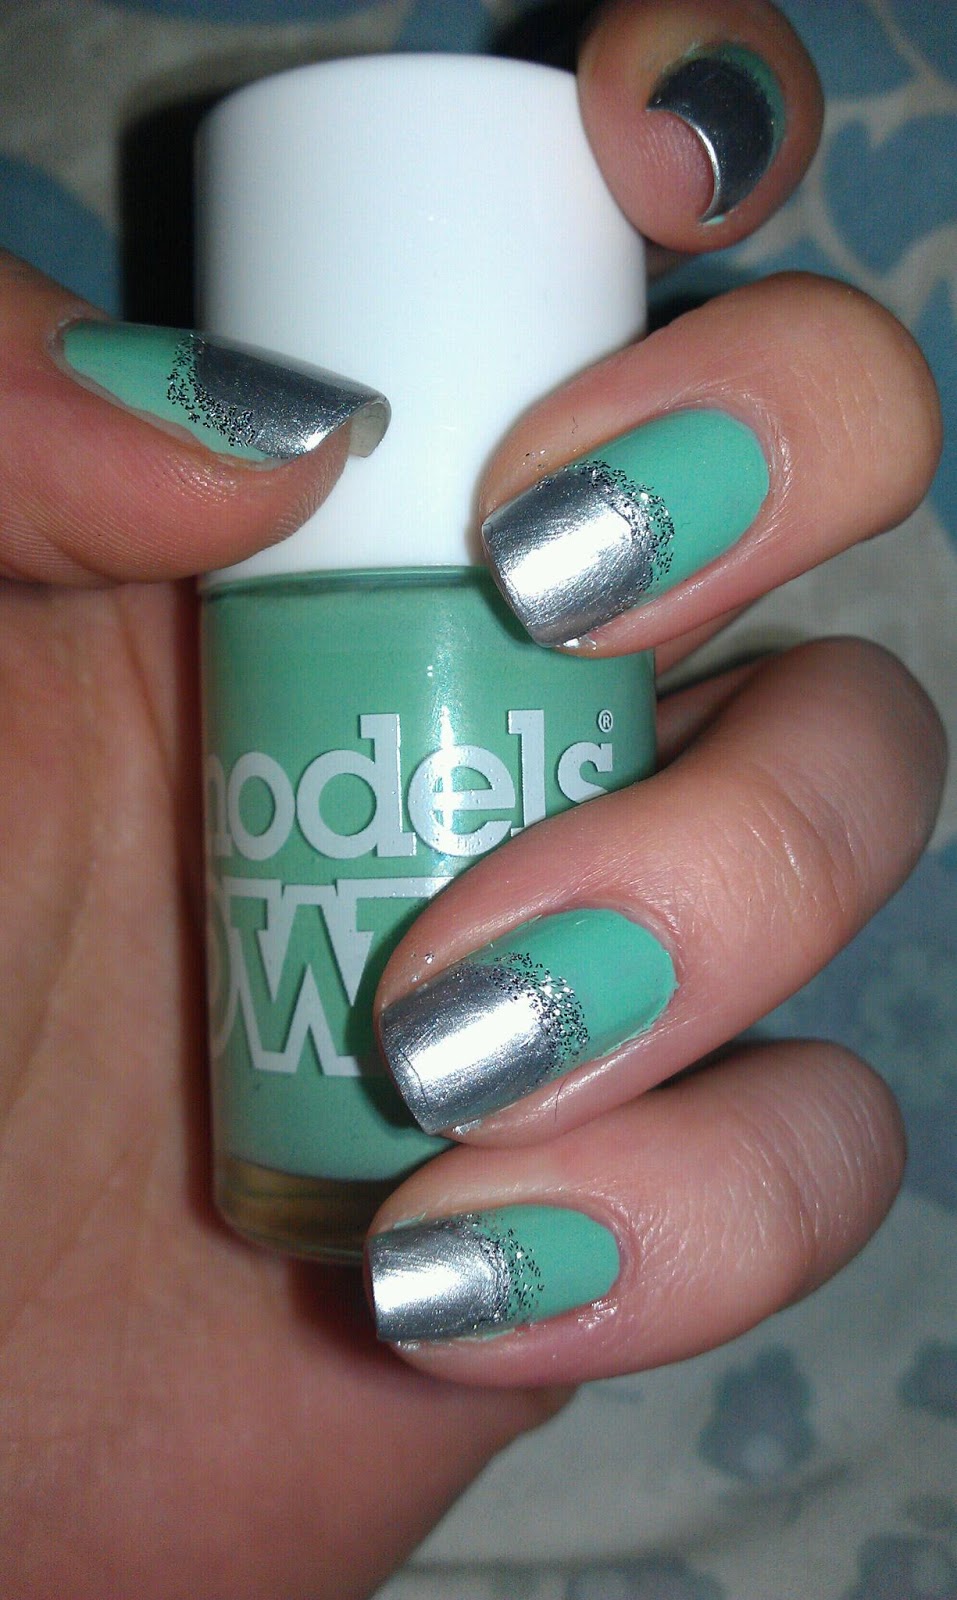
So I want to start a prom series ready for all the Proms coming up soon!.....So here is my first attempt! Its models own Jade Stone which I have had for a while and I LOVE.... the plain silver on the tips is Barry M Instant Nail Effects in 319 Foil, I have had this for quite some time now and I think they still do it, Its great you only need one coat and stays on really well. the sparkly silver is Barry M Limited Edition Effects which I picked up over a year ago in Boots its in silver glitter 149, Its quite an opaque glitter which you only need one coat!

The Final look!
So to get this look I started by priming my nail off with Sally Hanson (as always) then I applied one coat of the Jade stone! I know... It looks good for one coat! once it was fully dry I painted the bottom half of my nail with the Foil colour, just one coat again. I painted it with a curve around my nail, when doing this try to imitate the shape of your cuticle. Once that was fully dry I painted the glitter on the line, this covered any imperfections, I did not use and special brushes just the normal nail varnish brushes. I finished it off with the Seche Vite top coat with is super fast drying, Hi Shine and its really long lasting! 

Foil and Silver Glitter

I thought that this nail design was a bit of a twist on a French manicure which is a bit more special for an occasion like a prom! I chose to use the Jade but you could change the colour to any other for instance a pink would look really nice! I know a lot of girls do like a pink Prom dress!

Let me know what you think if you try this design out or if you use it for your prom or any other special occasion and I will continue with the prom series! Also if you have any requests for a colour scheme or design leave a comment and I will try my best to do them!
Jade Stone
I hope you have enjoyed this and follow me for me exciting designs!

X

Tuesday, 9 April 2013

NOTD Barry M Gelly Hi-Shine

As I said in my last post I'm not much of a pink person but I do a pink every now and again! So I went on a pink shop and got a couple the other day and this was the other pink! It's  Barry M Gelly Hi-Shine Nail Paint in Grapefruit 311.

I really like this hot pink colour its really nice and with all this cold rainy weather it really brightens the day!

The nail varnish itself is a diffirent consistancy to all my other nail varnishes, its much thicker, more sticky. It gives a really nice finish but takes a long time to dry. It is touch dry quite fast but it takes a good couple of hours to be completely dry! Iv really been into the matt nail varnish lately but this makes a nice change and it is very hi-shine...maybe it will push me back onto the shiny wagon!

I will definalty buy this nail varnish again and would recommend it, if you have time to leave it to dry!

X

Monday, 18 March 2013

Textured Nail Effect by Barry M

So I haven't posted in ages because iv been so busy with work since the new year, there aren't many social events so there is no need to keep up the nice nails and I haven't found many exciting new things to blog about.... But recently iv been seeing the Barry M texture nail effects so I decided to pick one up! They were about 3 or 4 pound and I got it from Boots.
So here are the results! I painted these yesterday night and iv worn it to work all day and I haven't used a top coat ,although my new favourite top coat is the rimmel matt top coat which lasts up to ten days, I love it, it turns any nail varnish into an elegant matt version! The textured nail varnish was quite strange when I first applied it as I'm used to smooth nails, it went on smooth but as it dryed it started to show its texture, its how I imagine it would be if you mixed sand into nail varnish, although this has a very fine texture even though its looks quite course, but as the day went on I got used to it. This is two coats, it drys fast and has an even coverage. This colour is Atlantic road no 305. So far its worn really well and I'm pleased with the result!

X

Monday, 17 December 2012

Day 17 of Blogmas! Xmas Glitter Snow Nails

Today I am a full on sick note, after being so ill iv has to take the day off work so after I had been to the doctors and could sleep no more I decided to paint my nails. I started with my Sally Hanson hard as nails then I have used my models own Jade Stone and I have followed it up with Barry M hexagon glitter. I love love love glitter this time of year and it cheers me up when I'm not well as well as if you knock your nail while your base colour is drying the glitter will cover these imperfections! This Barry M glitter (I'm not sure of the name but its got a number 1 on the bottom of the bottle) is really good! Iv had it for quite a while but I think it is one of there program lines. I have only applied one coat of this on the nail which I think is a really good amount for a snowy look.
I think it gives an almost snowy Christmas look! I'm pretty happy with it and as iv said before if it starts to chip just add more glitter! When my nail is 100% dry I will add one coat of top coat to add a nice shine!
X
Snow Fall Nails