Showing posts with label Seche Vite. Show all posts

Monday, 6 January 2014

NOTD to brighten up a Monday

Just a quick post to brighten up the dreaded back to work Monday! And I mean how can you not have a smile on your face with the models own Southern Lights!

I think I would have to rate this as my favourite glittery nail polish to date! I just applied 2 coats on to my nail which I had primed with Sally Hansen base coat then 2 coats of the models own Southern Lights and I finished it off with 2 coats of my Seche Vite top coat!

My boyfriend bought me this nail varnish for Christmas and he did a good job!

X


Friday, 15 November 2013

Nude Nails with Christmasy Black Sparkly Tips

So today I have decided to do a sort of step by step how I did my nails like this guide! 
So as you can see my natural nails are very stained because I wear nail varnish pretty much 100% of the time! Nearly all of the time I use base coat but on this one occasion I didn't and my nails got stained! So always wear base coat! So I started by shaping my nails with a very fine nail file as they only needed a touch up they didn't need to much re shaping or re sizing.


Next I gave my nails a gentle buff with a buffer block I got really cheap from superdrug and then applied my base coat. My most recent base coat is Sally Hansen miracle nail thickener, I don't think it does what it says it does but it is strong and if your just wearing the base cost it's nice and shiny, I would probably buy it again but not to thicken my nails! It's the one with the purple bottle and gold lid!

Next I applied one quite tick coat of miss sporty in a nude shade. It is number 24 it's one I have blogged about before, I really like it and 100% recommend it if you on a budget!


Once that had dried I followed the shape of my nails edge and painted it black, this was actually a massive pain in the arse as both of my black nail varnishes I've had for ages and ages and ages and they were both really thick and hard to work with but I'm sure if you had a thinner nail varnish that you would find the task of following the shape of your nails very easy! Before you do this you could tape up the sides of your nails as it gets very messy escically when you paint your hand your not so good at. I think taping up your nails is a complete waste of time and once your nails are 100% dry just soak them in some warm water for 5 minuets and give them a gentle brush with a nail brush or at the end of a bath or shower and all the varnish on your fingers will be gone!


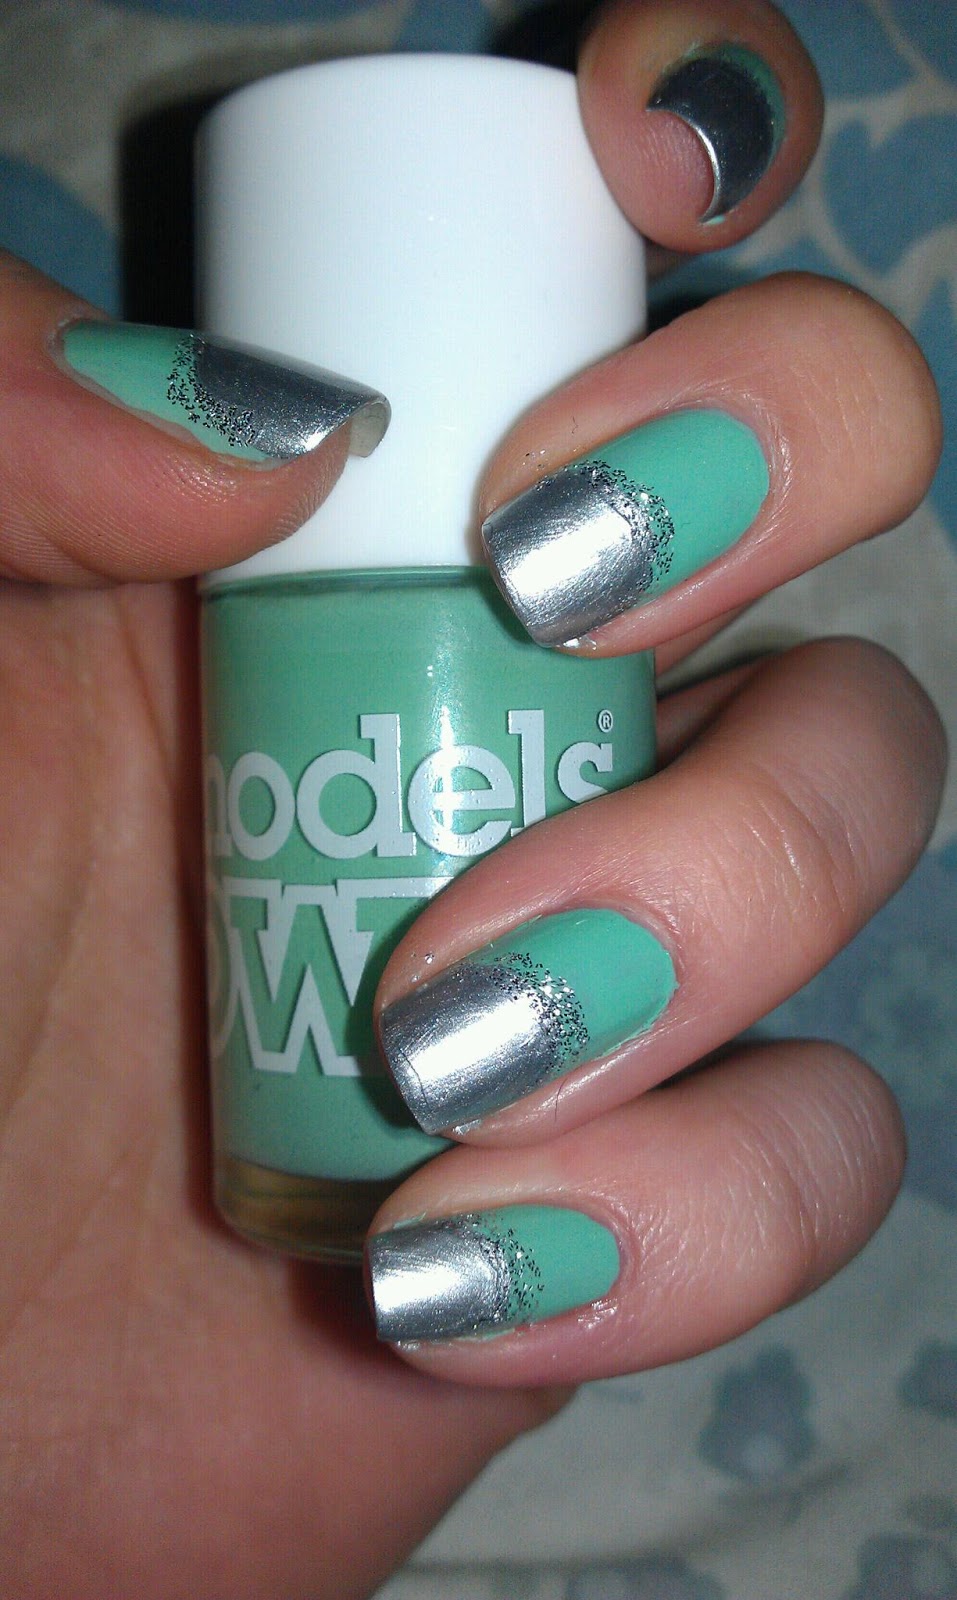
Once the black was dry you could just stop there as they look really nice. I applied one layer of top coat before I went on to the next stage, as I wanted something a bit more glittery and special! So I used the BarryM special effects limited addition glitter that I got a couple of years ago in a sale, it's still going strong, and applied that to the very edge of my nails!


So once the glitter had dryed, I put on two coats, I applied another layer of top coat. Seche Vite is my favourite glossy top coat I have ever come across in my whole life, no exaggeration! It makes any nail varnish I apply stay on for a week plus and I'm convinced it's the only reason my nails are so long. As you can see it's really messy around the edge of my nails where I've been a bit heavy handed.


So as I said earlier I just waited till all my nail varnish was dry, Seche Vite makes it touch dry really fast but it's not really 100% dry on the lower coats so I waited a couple of hours then soaked my nails for a couple of minuets rubbed them with the nail brush and here is the final result! 

 
I hope you have enjoyed this, if you try it out then you should send me a picture! Don't forget to follow my blog. I'll have lots of Christmas sparkly nail designs coming up and some product reviews on my current skin care and just lots of other bits and bobs really! 

X

Sunday, 18 August 2013

Black Pointy Nails, Louboutin Themed

Happy Sunday Everyone! 
So this is just a super quick post! I said I would post a pic of my black pointy nails in my last post Matte vs Glossy nails here so here it is!
 
As they are so long, yes they are my real nails with no acrylic or anything added, I have painted the underneath of them red and it reminded me of the Louboutin shoes! I just wanted to share the look with you really so here it is!
 
First I applied a Base coat then I used 2 coats of Rimmel 60 second black followed my the Rimmel matte Effect Top coat and then finally using my super shiny Seche Vite top coat on the tips in a French Manicure style!
 
 
Here is a close up of the red 'sole' of my nails! I used Barry M 262 Bright red and I used 2 coats.
 
 
And here it is again! I hope you like it! I would recommend trying not to get to much red on your skin when you pain the underside as I did and it is quite sore!
 
All of these colours lasted a week (that's right I couldn't believe it either) without chipping so I would recommend all these nail varnishes. I do think it has a lot to do with the 3 layers of top coat though!
 
 
Have a great Sunday!


Thursday, 15 August 2013

Matt Vs Gloss Nail Effects

Sorry I haven't posted for a while! If been so busy with life and getting a new job that I haven't really done much with my nails (or anything else) that's really been worth posting about! 

So since my silence I have been growing my nails nice and they have really been growing! they are the longest i remember them being for a long time! I think they have been growing to we'll thanks to all of the sun and its vitamins D I also think its due to the long pointy shape as normally when I break a nail I break the edge of the nail off but at the mement they don't have have edges as they are in a point not square! 


So here is my matte vs gloss nails! I saw something like this in a magazine I think it might have been an advert but I can't remember, it was black with looked so cool and I tried it out but was so busy I didn't get chance to post a pic! So ill do another post with then black later!

 So here I have used the models own scented grape and then after 2 coats I applied another 2 coats of the Rimmel matte top coat I appled this to the whole of my nail. Once that is completely dry I used my seche vite quick dry super gloss top coat and apply it to the tips only just like a French manicure.


I hope you like this matte vs gloss look! I find it really good with keeping your nail tips strong as well, most probably due to the thick layer of nail varnish you have on your nail! 

I should start posting a bit more regular again so keep an eye out for more posts! 

Have a great day and thanks for looking! 

X


Sunday, 26 May 2013

How To Do a DIY French Tip Manicure at Home

So today my mum asked me to do a French manicure on her nails.... as she made me a cuppa tea! The cheek! Any way as I love doing nails and can only do my own a couple of times a week I took her up on the offer! I took step by step pictures to show how I did it to make it as clear as possible! She already has the Sally Hansen hard as nails manicure set so that's what I used, I don't know where it was from or how much it cost but I think it was probably from boots or superdrug and wouldn't have been more than £10. I think that any clear or sheer nudie pink will also do a great job! I recently got the Barry M white and I think it does a great job! and its only £3.99!

Pre Manicure

This was the nails pre manicure! They are quite uneven with the nails being different shapes, some being round and some being square!

Prepared with Base Coat

So I prepared the nails by filing them all into a square shape and applying the Sally Hansen as Hard as Nails strengthener as a base coat. This did not come in the kit but I wanted to use a base coat first and this one is one I like! My mums little finger nail was as short as it could be so I just smoothed it off with the nail file and left it short, as her other nails are not too long and it is only her little finger nail I don't think it matters to much as its not a focal nail and we can just paint a tip onto it later! If it was the index finger I would have thought about trimming the other nails down more!

White Tips

Next I painted the white tips onto the bottoms of the nails, this kit came with the tapes if you do not have a steady hand to do it yourself! I always free hand the white tips as I personally find it easier to do and I do not like the strips as I tend to find they leave a sticky mess on your nails but my mum always uses them when she does her nails her self and she finds them really good! I think its a personal taste thing! I paint the white tips by painting in a sideways motion, sort or how you would line your eye, I start on one corner of the nail and sweep the brush towards the centre and take it as far across the nail as possible. When it cant go any further I dip the brush back into the polish and start from the other side to they meet in the middle. If you make a mess here, like I have, its not the end of the world you can clear it up later with a cotton bud and some nail varnish remover or soak your hands in some warm soapy water for 10 minutes when all the nail varnish has dried and it will just rub away with a nail brush!


Nude Over Coat

Next I applied 2 coats of the nearly nude OVER the whole nail including the white tip, this gives a nicer finish and the white isn't so garish. When doing this manicure I did not have to wait very long for the colours to dry at all. The most time I probably wait between coats was between the white tips and applying this nearly nude. Which was about 5 minuets and it was only that long as it took me a while to do all the tips!

The Finished Look

Here is the final look for the French tips! as you can see by painting a tip onto the little finger nail you can't really tell that there isn't a nail there! I applied the Seche Vite top coat so it would dry super fast and shiny! and its as simple as that! I hope you enjoy the rest of this bank holiday! the weather is meant to be really nice tomorrow so don't forget to apply sun cream!

X

Sunday, 28 April 2013

NOTD Neon Green with Black and White

So I bought the models own Matt nail varnish in Toxic Apple a couple of days ago and wanted to try it out! as the weather is a bit gloomy I didn't really fancy having full on BRIGHT green nails so this morning I saw a design on twitter which inspired me to do this! 

Anyway back to the nail polish its self, its a really nice colour, very neon but I don't rate it for the matt qualities. I was a bit unsure on having just a nail polish which was Matt as you only have each individual colour that is matt rather than being able to pick what colour you want. I would recommend getting the Rimmel Matt Top coat if you want a matt colour but if your looking for something neon then this is a great choice! The other colours in the range also look really good too! It might have looked more neon with 2 coats but I only used one each time as I didn't want to have a huge layer of nail varnish on my nails!


The finished look

I started by trimming my nails then shaping them and putting some base coat on. my nails where much longer but the edges were very weak and when I touched anything they would bend and it would chip my nail varnish so even though they looked nice it was time for a trim!

Prep the Nails
Next I painted my nails a combination of colour using Rimmel 60 second 800 Black Out, The Colour Institute in French white (it was a white I got in a French manicure set) and then Models Own in toxic apple. I just did one coat and I didn't paint them in an order I just did it randomly. 

First Coat of Nail Colours
Next I painted 3/4 of the nail in a different colour to the colour already on my nail. So on my green nail I painted it with the black starting 1/4 of the way down my nail following my cuticle line and leaving a gap around the edge. If I wanted to do the green on top of the black I had to first paint it with the white then paint the neon green over when white once it had dried! 

The Finished Look

This was super easy and really quick! I then added the Seche Vite Top Coat! I hope you like this look! if you try it out let me know what you think!

X

Friday, 26 April 2013

NOTD with Models Own scented

So since I tried out the models own scented Strawberry Tart Iv been wanting to get another one. I really like the look of the pastel purple in Grape Juice and have been lusting after it for ages now! Lucky for me pay day has arrived to today I went and picked it up! 

It smells amazing! I didn't think I'd say it but it smells even better than the Strawberry Tart! The smell reminds me of children's shampoo! I know its strange but its really nice.... I know deep down we all wish we could still use the shampoo out of the colourful bottles shaped like fish and splash about with them in the bath.... 

.... anyway back to the point! As always I find models own nail varnishes get better the longer you have them, you can't really tell because I have added a pretty spotty design (if I do say so myself) that even with 2 coats I found it quite translucent in places but this does not put me off as the varnishes tend to stay nice and thin in the bottles for a long time. 


I started by painting my nails with a base coat, then painted on 2 coats of the Grape Juice.Then for this design I just used a hair slide as I do not have a doter, although I should invest, to make a line of dots across my nail! It was really fast and only took a couple of minuets. I started with the Strawberry Tart by models own then for the second line used Barry M Gelly shine in Grapefruit 311.


I didn't use different sized 'doters' to do the different size dots, I just used the back of the hair slide at a slanty angle for the bigger dots so a larger surface area was covering my nail and I used just the tip for the smaller dots so a smaller surface area was touching the nail. I also only dipped once on the smaller dots and dipped into the colour every time for the larger dots.


To finish it off I applied a coat of my super fast drying super shine Seche Vite top coat! you can still 100% smell the grape scent through the top coat, although you can't small the strawberry as the Grape does overpower it but that is what I wanted!


Sorry about the slight mess around the edges of my nails it always look much worse in the photos than in real life! I hope you like this look and if you haven't yet I recommend you try the scented colours out! When I got these today they where on buy on get one half price in boots! I hope you have a nice weekend! Let me know if you try this or something similar out!

X

Thursday, 18 April 2013

Prom Nails Jade Models Own and Barry M

So I want to start a prom series ready for all the Proms coming up soon!.....So here is my first attempt! Its models own Jade Stone which I have had for a while and I LOVE.... the plain silver on the tips is Barry M Instant Nail Effects in 319 Foil, I have had this for quite some time now and I think they still do it, Its great you only need one coat and stays on really well. the sparkly silver is Barry M Limited Edition Effects which I picked up over a year ago in Boots its in silver glitter 149, Its quite an opaque glitter which you only need one coat!

The Final look!
So to get this look I started by priming my nail off with Sally Hanson (as always) then I applied one coat of the Jade stone! I know... It looks good for one coat! once it was fully dry I painted the bottom half of my nail with the Foil colour, just one coat again. I painted it with a curve around my nail, when doing this try to imitate the shape of your cuticle. Once that was fully dry I painted the glitter on the line, this covered any imperfections, I did not use and special brushes just the normal nail varnish brushes. I finished it off with the Seche Vite top coat with is super fast drying, Hi Shine and its really long lasting! 

Foil and Silver Glitter

I thought that this nail design was a bit of a twist on a French manicure which is a bit more special for an occasion like a prom! I chose to use the Jade but you could change the colour to any other for instance a pink would look really nice! I know a lot of girls do like a pink Prom dress!

Let me know what you think if you try this design out or if you use it for your prom or any other special occasion and I will continue with the prom series! Also if you have any requests for a colour scheme or design leave a comment and I will try my best to do them!
Jade Stone
I hope you have enjoyed this and follow me for me exciting designs!

X

Sunday, 14 April 2013

NOTD Black and Pink with Seche Vite

Recently one of my friends recommended that I try the topcoat by Seche Vite, it is so fast drying and super shine I can't believe how good it is! It is also meant to be super durable, it is blended to make all of the nail varnish layers bond together for the super durable effect. I bought it off eBay for £7.95 plus £1.00 postage and packaging! It is 100% worth the money! It arrived the next day and came with a free gift of Swarovski crystals. I have used them in this design for my flower centres! I bough it from ELM Beauty Ltd, I will post the link below!

http://www.ebay.co.uk/itm/SECHE-VITE-FAST-DRY-TOP-COAT-14ML-FREE-GIFT-/251178206506?_trksid=p5197.m1992&_trkparms=aid%3D111000%26algo%3DREC.CURRENT%26ao%3D1%26asc%3D14%26meid%3D6963419847275294887%26pid%3D100015%26prg%3D1006%26rk%3D1%26sd%3D251178206506%26


For this design I painted my nails with Sally Hansen hard as nails, then 2 coats of Rimmel 60 seconds in 800 black out (I have had this for ages) then I used my models own scented strawberry tart to dot on flowers but putting 5 small dots close together, using an orange stick. I then put a dot of the hard as nails in the centre of each flower and picked up the beautiful crystals with the orange stick and placed them onto the nail. Once it was dry I put a nice fairly thick coat of the Seche Vite dry fast top coat on and within 2 minutes it was completely dry!

TOP TIP: When dotting the flowers I placed a blob of the nail varnish I was using onto a piece of paper, as soon as the colour you are dotting starts to dry out and thicken get a new blob of the colour. If you do not then you may end up with lines of the nail varnish 'stringing' across your base coat.

I hope you have all had a good Sunday! I'm starting to feel much better after hitting my head! It's taken long enough!

X

close up of nails