Monday, 27 May 2013

NOTD with Models Own

Just a quick post for an alternative colour way for the half and half nails! I really like this look I think its really pretty for the summer and its a slightly diffirent colour combination! Iv used models own scented Grape Juice and the normal Jade Stone!
I really love these nail varnishes and I have a great grapey smell!
X

Sunday, 26 May 2013

How To Do a DIY French Tip Manicure at Home

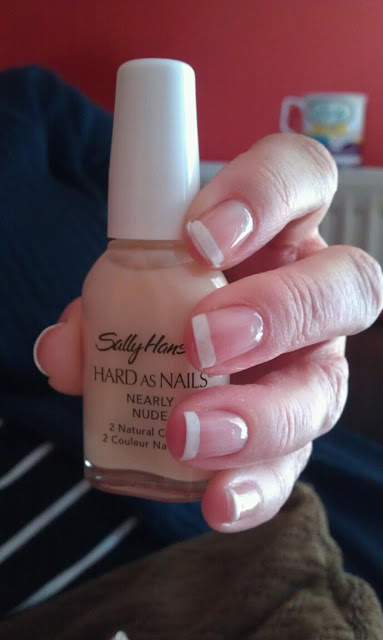
So today my mum asked me to do a French manicure on her nails.... as she made me a cuppa tea! The cheek! Any way as I love doing nails and can only do my own a couple of times a week I took her up on the offer! I took step by step pictures to show how I did it to make it as clear as possible! She already has the Sally Hansen hard as nails manicure set so that's what I used, I don't know where it was from or how much it cost but I think it was probably from boots or superdrug and wouldn't have been more than £10. I think that any clear or sheer nudie pink will also do a great job! I recently got the Barry M white and I think it does a great job! and its only £3.99!

Pre Manicure

This was the nails pre manicure! They are quite uneven with the nails being different shapes, some being round and some being square!

Prepared with Base Coat

So I prepared the nails by filing them all into a square shape and applying the Sally Hansen as Hard as Nails strengthener as a base coat. This did not come in the kit but I wanted to use a base coat first and this one is one I like! My mums little finger nail was as short as it could be so I just smoothed it off with the nail file and left it short, as her other nails are not too long and it is only her little finger nail I don't think it matters to much as its not a focal nail and we can just paint a tip onto it later! If it was the index finger I would have thought about trimming the other nails down more!

White Tips

Next I painted the white tips onto the bottoms of the nails, this kit came with the tapes if you do not have a steady hand to do it yourself! I always free hand the white tips as I personally find it easier to do and I do not like the strips as I tend to find they leave a sticky mess on your nails but my mum always uses them when she does her nails her self and she finds them really good! I think its a personal taste thing! I paint the white tips by painting in a sideways motion, sort or how you would line your eye, I start on one corner of the nail and sweep the brush towards the centre and take it as far across the nail as possible. When it cant go any further I dip the brush back into the polish and start from the other side to they meet in the middle. If you make a mess here, like I have, its not the end of the world you can clear it up later with a cotton bud and some nail varnish remover or soak your hands in some warm soapy water for 10 minutes when all the nail varnish has dried and it will just rub away with a nail brush!


Nude Over Coat

Next I applied 2 coats of the nearly nude OVER the whole nail including the white tip, this gives a nicer finish and the white isn't so garish. When doing this manicure I did not have to wait very long for the colours to dry at all. The most time I probably wait between coats was between the white tips and applying this nearly nude. Which was about 5 minuets and it was only that long as it took me a while to do all the tips!

The Finished Look

Here is the final look for the French tips! as you can see by painting a tip onto the little finger nail you can't really tell that there isn't a nail there! I applied the Seche Vite top coat so it would dry super fast and shiny! and its as simple as that! I hope you enjoy the rest of this bank holiday! the weather is meant to be really nice tomorrow so don't forget to apply sun cream!

X

Friday, 24 May 2013

Pink Half and Half Nails! How To...

This is just a really quick post on how I did this half and half nail look! Nice and simple and quick for the bank holiday weekend and nice and summery! You can do this with any two colours! Iv chosen two pinks as you can see!

To do this I started with the lightest colour my pale pink and painted the whole nail (models own scented), I useded the lightest colour first so that the bottom colour will not show through any of the too colour when you apply it! Once the bottom colour on the whole of the nail is touch dry carefully apply the second colour, in my case the dark pink (barry m gellies) starting at the edge of the nail in one long smooth stroke then working my way towards the center on the nail. If you are careful and rest your hand on a surface it is easy to keep the line straight and only paint it on half of the nail. Finish buy applying a top coat!

I hope you like this quick and easy look! Some other nice combos might be lilac and jade, blue and yellow or a brighter green and a darker grey! You could also put some glitter on one of the sides! Because I do love glitter!

Have a nice bank holiday weekend I know I will!

X

Tuesday, 14 May 2013

What's in my Bag (Purse)

So Today I decided to do a post on what's in my bag! I see a lot of them on YouTube and blogs and wanted to give it a go myself so here goes...

My Bag.... and Cat

It's a tan leather bag it's from Topshop and is 100% leather, it's got 2 handles which I use and a no detachable shoulder strap with I have undone with the buckle and put into the side pockets. I had this bad for a couple of months now and you can tell its leather because it has worn really well. It was lighter when I got it and the longer I've had it the darker it's gone! The bag I had before this one was about the size of a crisp packet so I would say I now have a large bag and most of the time I just carry rubbish around with me which I think you will be about to see!

In my bag first of all here is the pretty normal stuff... My purse but It's Not Me It's You... its also leather, its hand made by a small company based in Hackney... I literally love this purse! Its quite new to me I only got it about 2 months ago. My sunglasses which are also new iv only had them a couple of weeks so there in pretty good condition.... my car and work keys along with my old clear nail varnish, just in case of an emergency and a bit of costume jewellery .. pretty sure this is here from when I put jewellery on in the morning and it annoys me so I chuck it in my bag as the day goes on! Its always good to have a spare but of jewellery in case you need to dress up what your wearing last second!

The 'normal' things
So.... next I have lip balm, a vanity mirror, note book, pens, camera which goes in its case, batteries, a plaster, some pain killers and a hand cream bar from Lush! I love this hand cream... its great to carry around. Its not messy at all and when you need it you just rub it into your hands and the warmth of your hands make the hand cream rub off onto your skin... and it smells beautiful!

More bits and pieces...
next I carry around this horrible bright pink bag which I got free with some straighteners  I only use this bag in my bag because once I had a HORRIBLE experience with hair spray where the lid came off in my bag the sprayer got pushed down and I didn't realise until everything in my bag got covered in hair spray and way rock hard! ill move onto everything in there in a moment. Iv got hair bands, hair pins, more pain killers and hayfever tablets and a lipstick! I know I always bang on about Topshop but this is one of the longest lasting lipsticks I have every used! sometimes I struggle to get it off the next day! as far as I'm aware its just there basic lipstick range and all of them are like that.

....And More Bits and Pieces....
In my pink bag I have face wipes, always great for an emergency or spillage, hair spray I love the TRESemme freeze hold, I like a hairspray that hold and isn't shiny and this one does it for me. Some Batiste dry shampoo... I'm using it all the time and its great if you end up going out after work without warning, adding volume and for when your having a lazy day! ....more painkillers.... didn't realise I had that many! An eyebrow pencil, and a mascara! I don't rate this mascara which is why I have it in my bag just in case rather than using it as my everyday or going out mascara! I think that if your having a lazy day... which I have a lot of dry shampoo, eyebrow pencil and mascara can make a world of difference which is why I carry them as opposed to a whole make up selection around with me!


Last of all my bag is full of a load of rubbish! I regularly clear out my bag but somehow this always happens....

A Pile of Doom!
I hope you enjoyed this look through my bag!

X

Saturday, 11 May 2013

Prom Nails No.3 Pink and White French Twist

So here is my 3rd prom look. I haven't added any glitter to this look but I think you could easily add glitter if you wanted to for that extra special look! It's inspired by a French tip manicure but I added an extra layer of pink and have moved away from the traditional small straight white tip. Instead I have gone for the 'cloud' style again and a white then pink to add some extra colour!
The Final Look
So I begun by prepping my nails, I needed to give them all a good cut as they had started to break and where quite brittle and flakey which I am putting down to the weather! My nails are very slightly yellow, I'm pretty sure this is down to constantly wearing nail varnish and not letting my nails breath. I always wear base coat but it could be from some stubborn colours not coming away.... Anyway moving on. I started by trimming shaping and applying a base coat. I recommend also pushing back or trimming your cuticles, I didn't do this today but I do it regularly.

Next I have used a white nail varnish, it's a Barry M one I have never used before and I think it has very good coverage. Using the nail varnish brush I placed it half way up the centre of my nail and steadily pulled the brush down my nail in one smooth stroke. I then followed this step to the left and to the right of the original strip staggering my starting point each time. I wanted to creat a random pattern and have tried not to make any of the nails the same, although they are all quite similar.


Once I had waited for the nail varnish to dry I then followed the original step with the pink nail varnish, only starting a couple of millimetres down from the white. This then created a layered look with the white now outlining the pink cloud shape which you can see in the top picture. I then finished it off with a layer of topcoat for shine and so it will last!

I hope you enjoy your weekend! 

X

Thursday, 9 May 2013

Prom Look No.2 Purple and Silver with Glitter

So here is the second of my prom nail designs! Its a silver and purple design with small and large glitter chunks! I saw a design a bit like this on another blog, I can't remember what one, and made a variation of it!
The finished look

So to get this design I started with a lilac nail polish I had already had on my nails for a couple of days which had stared to chip around the edges.  I used a silver nail varnish and painted them with 3 separate strokes starting at different points on the nail.to achieve this 'cloud' type of effect. I think you could just stop here and maybe put an outline colour on as I think it would make it look a bit more finished.

Painting the 'Clouds'


Next I used a hair pin to dot a 'blob' of nail varnish above the cloud type effect and then dragged the 'blob' of nail varnish down to the rest of the silver nail varnish so it is all joined together. If you can make the line thinner it looks better but it is quite difficult to do this with the hair pin. If I had a small detail brush or a nail art pen this would have been much easier and cleaner! Although this was not to had to do, the lines are just a bit uneven which I don't mind but some people do!

Joining the Dots

Once I had done this I painted glitter on the bottom half of the silver chunk of nail, this doesn't need to be steady or neat you can just do it quite roughly. I have used a fine glitter to do this as I want it to shimmer on the edge of my nail and not to be to noticeable.
Adding the Fine Glitter


Finally I used a chunky glitter and put it on the dots. you could also use rhinestones or you could leave them blank. the larger chunks of glitter are shown in the top picture. This look was easy and quick to do. I think it looks much more skilled than it actually is and would be a perfect look for a lilac/purple prom look!

Also as a bit of extra news I am currently on a 'healthy living plan' = DIET!!! Its really hard work, iv been eating healthy and cutting back and exercising. I might start doing some posts about that, ill see how it goes! 

X