Showing posts with label Sally Hansen. Show all posts

Friday, 15 November 2013

Nude Nails with Christmasy Black Sparkly Tips

So today I have decided to do a sort of step by step how I did my nails like this guide! 
So as you can see my natural nails are very stained because I wear nail varnish pretty much 100% of the time! Nearly all of the time I use base coat but on this one occasion I didn't and my nails got stained! So always wear base coat! So I started by shaping my nails with a very fine nail file as they only needed a touch up they didn't need to much re shaping or re sizing.


Next I gave my nails a gentle buff with a buffer block I got really cheap from superdrug and then applied my base coat. My most recent base coat is Sally Hansen miracle nail thickener, I don't think it does what it says it does but it is strong and if your just wearing the base cost it's nice and shiny, I would probably buy it again but not to thicken my nails! It's the one with the purple bottle and gold lid!

Next I applied one quite tick coat of miss sporty in a nude shade. It is number 24 it's one I have blogged about before, I really like it and 100% recommend it if you on a budget!


Once that had dried I followed the shape of my nails edge and painted it black, this was actually a massive pain in the arse as both of my black nail varnishes I've had for ages and ages and ages and they were both really thick and hard to work with but I'm sure if you had a thinner nail varnish that you would find the task of following the shape of your nails very easy! Before you do this you could tape up the sides of your nails as it gets very messy escically when you paint your hand your not so good at. I think taping up your nails is a complete waste of time and once your nails are 100% dry just soak them in some warm water for 5 minuets and give them a gentle brush with a nail brush or at the end of a bath or shower and all the varnish on your fingers will be gone!


Once the black was dry you could just stop there as they look really nice. I applied one layer of top coat before I went on to the next stage, as I wanted something a bit more glittery and special! So I used the BarryM special effects limited addition glitter that I got a couple of years ago in a sale, it's still going strong, and applied that to the very edge of my nails!


So once the glitter had dryed, I put on two coats, I applied another layer of top coat. Seche Vite is my favourite glossy top coat I have ever come across in my whole life, no exaggeration! It makes any nail varnish I apply stay on for a week plus and I'm convinced it's the only reason my nails are so long. As you can see it's really messy around the edge of my nails where I've been a bit heavy handed.


So as I said earlier I just waited till all my nail varnish was dry, Seche Vite makes it touch dry really fast but it's not really 100% dry on the lower coats so I waited a couple of hours then soaked my nails for a couple of minuets rubbed them with the nail brush and here is the final result! 

 
I hope you have enjoyed this, if you try it out then you should send me a picture! Don't forget to follow my blog. I'll have lots of Christmas sparkly nail designs coming up and some product reviews on my current skin care and just lots of other bits and bobs really! 

X

Sunday, 26 May 2013

How To Do a DIY French Tip Manicure at Home

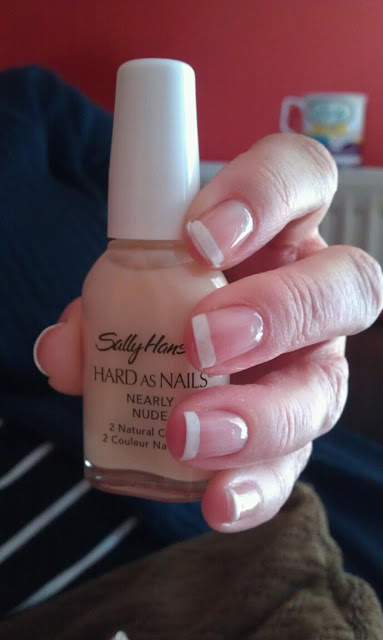
So today my mum asked me to do a French manicure on her nails.... as she made me a cuppa tea! The cheek! Any way as I love doing nails and can only do my own a couple of times a week I took her up on the offer! I took step by step pictures to show how I did it to make it as clear as possible! She already has the Sally Hansen hard as nails manicure set so that's what I used, I don't know where it was from or how much it cost but I think it was probably from boots or superdrug and wouldn't have been more than £10. I think that any clear or sheer nudie pink will also do a great job! I recently got the Barry M white and I think it does a great job! and its only £3.99!

Pre Manicure

This was the nails pre manicure! They are quite uneven with the nails being different shapes, some being round and some being square!

Prepared with Base Coat

So I prepared the nails by filing them all into a square shape and applying the Sally Hansen as Hard as Nails strengthener as a base coat. This did not come in the kit but I wanted to use a base coat first and this one is one I like! My mums little finger nail was as short as it could be so I just smoothed it off with the nail file and left it short, as her other nails are not too long and it is only her little finger nail I don't think it matters to much as its not a focal nail and we can just paint a tip onto it later! If it was the index finger I would have thought about trimming the other nails down more!

White Tips

Next I painted the white tips onto the bottoms of the nails, this kit came with the tapes if you do not have a steady hand to do it yourself! I always free hand the white tips as I personally find it easier to do and I do not like the strips as I tend to find they leave a sticky mess on your nails but my mum always uses them when she does her nails her self and she finds them really good! I think its a personal taste thing! I paint the white tips by painting in a sideways motion, sort or how you would line your eye, I start on one corner of the nail and sweep the brush towards the centre and take it as far across the nail as possible. When it cant go any further I dip the brush back into the polish and start from the other side to they meet in the middle. If you make a mess here, like I have, its not the end of the world you can clear it up later with a cotton bud and some nail varnish remover or soak your hands in some warm soapy water for 10 minutes when all the nail varnish has dried and it will just rub away with a nail brush!


Nude Over Coat

Next I applied 2 coats of the nearly nude OVER the whole nail including the white tip, this gives a nicer finish and the white isn't so garish. When doing this manicure I did not have to wait very long for the colours to dry at all. The most time I probably wait between coats was between the white tips and applying this nearly nude. Which was about 5 minuets and it was only that long as it took me a while to do all the tips!

The Finished Look

Here is the final look for the French tips! as you can see by painting a tip onto the little finger nail you can't really tell that there isn't a nail there! I applied the Seche Vite top coat so it would dry super fast and shiny! and its as simple as that! I hope you enjoy the rest of this bank holiday! the weather is meant to be really nice tomorrow so don't forget to apply sun cream!

X

Sunday, 14 April 2013

NOTD Black and Pink with Seche Vite

Recently one of my friends recommended that I try the topcoat by Seche Vite, it is so fast drying and super shine I can't believe how good it is! It is also meant to be super durable, it is blended to make all of the nail varnish layers bond together for the super durable effect. I bought it off eBay for £7.95 plus £1.00 postage and packaging! It is 100% worth the money! It arrived the next day and came with a free gift of Swarovski crystals. I have used them in this design for my flower centres! I bough it from ELM Beauty Ltd, I will post the link below!

http://www.ebay.co.uk/itm/SECHE-VITE-FAST-DRY-TOP-COAT-14ML-FREE-GIFT-/251178206506?_trksid=p5197.m1992&_trkparms=aid%3D111000%26algo%3DREC.CURRENT%26ao%3D1%26asc%3D14%26meid%3D6963419847275294887%26pid%3D100015%26prg%3D1006%26rk%3D1%26sd%3D251178206506%26


For this design I painted my nails with Sally Hansen hard as nails, then 2 coats of Rimmel 60 seconds in 800 black out (I have had this for ages) then I used my models own scented strawberry tart to dot on flowers but putting 5 small dots close together, using an orange stick. I then put a dot of the hard as nails in the centre of each flower and picked up the beautiful crystals with the orange stick and placed them onto the nail. Once it was dry I put a nice fairly thick coat of the Seche Vite dry fast top coat on and within 2 minutes it was completely dry!

TOP TIP: When dotting the flowers I placed a blob of the nail varnish I was using onto a piece of paper, as soon as the colour you are dotting starts to dry out and thicken get a new blob of the colour. If you do not then you may end up with lines of the nail varnish 'stringing' across your base coat.

I hope you have all had a good Sunday! I'm starting to feel much better after hitting my head! It's taken long enough!

X

close up of nails


Tuesday, 15 January 2013

Blue Fade, Nail Design,With Glitter

So today I decided to paint my nails with a blue fade with the light blue starting at the cuticle and the dark blue at the tip. I also added some glitter to the light blue for extra sparkle!!! So I got all of these nail varnishes for Christmas (except the base coat) they are Miss Cole nail polishes in a light pearlesent blue (no 10) and a dark pearlesent blue (no 16). And also a Rimmel lasting finish in 500 Disco Ball. And finally my Sally Hanson hard as nails.
Its Tue first time I have used these Miss Cole polishes, I was impressed with the dark blue straight away, it is so pigmented, the light blue was pretty watery though. But I think after 2 coats it shows up just fine!

So to get this look I preped my nails by trimming, fileing them, cutting off my cuticles (i know your just Kent to push them back and I regiment it if that works for you but I started cutting mine years ago and prefure to do that) then applying a base coat. For this I used another Sally Hanson, again hard as nails but this time in clear. Once the base coat was fully dry I applied one coat of the light blue colour. Once that was dry I painted a second coat 3/4 of the way down my nail, ensuring to put a slightly thicker coat so it doesn't dry as fast. Then using the dark blue straight away I painted a strip across the final 1/4 of my nail at the tip, much like a French manicure. Then you get your clear nail varnish (preferably an old one) and paint a strip across the line where the two colours meet. Then using the brush gently dab it on the line so the colours fade into one another. I then waited for the now rather thick layer on nail varnish to dry. Once it was dry I painted on the glitter as I like a bit of embelisment. You can paint it over the whole nail if you wish but I stopped as the fade started! Finally you can paint this with your top coat.

Iv included one picture before the glitter and after. I hope you enjoy this! Please follow and comment!

X

Tuesday, 27 November 2012

Elegant Nail Design With No7

So this is my current nail design... I hope you like it, comment if you have any questions!

Here is my nail design I half copied off a work colleague and half made up myself, so I will name this design the Lezley on behalf of Lezley herself!!!

My final result
So I started by using a base coat, I use Sally Hanson hard as nails, I always use this one, its a good base coat but peels off fast if you don't apply a colour and just want the natural look so I wouldn't recommend it for that. I do find when you layer it it also does strengthen your nails!
Next I painted 2 coats of No7 pigment rich colour number 23, this is a pigment rich colour but I think you still need 2 coats as otherwise it is slightly streaky!
On top of that I applied my Nail art pen which has a brush and nib along with a pot of black rhinestones attached to it. I got this as a duo set with a gold from Topshop I think it cost £7.50 I git it quite a while ago but they still sell them now, I used the pen to draw a line down my ring finger nail, I haven't been able to do the straightest line but I think with practice or on someone else it would be easier!
I then applied a line of my base coat along the nail bed of my thumb line and using the end of a hair clip dotted in some of the base coat to be able to pick up the rhinestones to apply them to my nail, I applied 6 rhinestones to each nail bed.
Finally I applied one final coat of the base coat to the whole nail, once it was all dry to stop any colour bleeding! And here is my final result!

X

Products I used