Showing posts with label notd. Show all posts

Wednesday, 25 June 2014

Jazzy models own NOTD

Just a quick post! Here is my NOTD using models own! I started with their new rubber texture base coat. I used 4 different colours Purple Grey, Misty Grey, Sun Hat(from the new for tans range.... Which by the way I can't get enough of) and strawberry tart (the strawberry scented one).


This design was super easy to create and other than drying time was really quick. I stated by applying 2 coats of each colour randomly on different nails, I then added a couple of dots, lines and tips! 


My favourite designs are the ones with more then 3 colours on but I think it's important to keep it simple otherwise it can make the whole look appear to much! 

X

Thursday, 15 May 2014

NOTD models own Turquoise Gloss HyperGel

This is just a quick post as I have had loads of comments on how nice this colour is! All I really wanted to do was share the love a bit!

As it says in the title it is one on models own from the HyperGel range (no UV required) in the shade of .... Turquoise Gloss! I got it from the Shepherd's Bush Westfield shopping center in a 6 bottles for £20 deal! This was the only HyperGel polish bought, and the only one I have, and I love it! 

I have had it on for 4 days now chip free! The colour is much more vibrant when it's applied than the colour it shows on the bottle which I love! I will 100% be buying more from this HyperGel range in the future! And would 100% recommend it! 

Xx

Saturday, 29 March 2014

Free Hand French tip NOTD

Just a quick post for my nail of the day! Just a simple free hand French Tip manicure. Only took me a couple of minutes!

My top tips are....

1. Use a nail varnish that is new, nice and runny not gloopy!

2. Practice! Practice makes perfect (not that these are perfect)

3 . Don't worry if you get it on your skin, you can scrub it off the next day when the nail varnish is 100% rock solid or use a cotton bud and nail varnish remover to wipe it off.

Personally I think using a nail varnish remover and a cotton bud is useless and I can never get it off my skin and end up wiping it off my nail instead! But that's just me!

Here I used an old base coat first, next one coat of a nude polish (i used miss sporty) then Barry M white for the tips. To top it off I finished with my Seche Vite top coat!.... And Bob's your unkle! Done!

X

Monday, 17 March 2014

Barry M NOTD

So I haven't posted for ages.... And I just did this snazzy little number the other day! It's a couple of different blue colours, mostly Barry M and I think one miss sporty! Used the a Barry M nail pen for the stripes!

Monday, 6 January 2014

NOTD to brighten up a Monday

Just a quick post to brighten up the dreaded back to work Monday! And I mean how can you not have a smile on your face with the models own Southern Lights!

I think I would have to rate this as my favourite glittery nail polish to date! I just applied 2 coats on to my nail which I had primed with Sally Hansen base coat then 2 coats of the models own Southern Lights and I finished it off with 2 coats of my Seche Vite top coat!

My boyfriend bought me this nail varnish for Christmas and he did a good job!

X


Wednesday, 26 June 2013

Pointy Nails! NOTD

So I decided to go for a change from my normal square shaped nail! 
I don't really like the rounded nail shape on my nails and wanted to go for something a bit different! I have seen a lot of the 'Rihanna' style nails but I haven't seen it on real nails only acrylics.... But while at work the other day I accidentally broke a nail into this shape, which is ironically the worst shaped nail I have now, so I thought I would give it a go and give them all a re-shape! 

So here it is...


So here they are with the Leighton Denny nail polish in Embellish Me, this is the first time I have tryed this nail polish, my mum was given it as a gift and I tried it out, I love everything about it, the colour itself, the depth of colour, how pigmented it is and how well it stayed on my nail, I don't know where it is from or how much it cost but even if it was expensive I would 100% buy another one! 


If you have tried the Leighton Denny range out let me know what you think of some of the other colour available!


I think the pictured don't really do my nails justice for how long they are, but here they are with models own in fuzzy peach. If you want to re-create this look then I recommend taking nail clippers to the corners of your  nails then filling them one side at a time to create a point!


This is the nail polish I am wearing today! I re-shaped them from the original photos to give them even more of a point. To do this filled my nails right down to the bottom corners as there was a bit of re-growth. they seem to look a bit shorter even though I didn't take any off the length but they do look more pointed, here I am wearing models own in Jade Stone, I always bang on about this nail varnish as it is one of my favorites!

As i said before let me know if you try this out and what you think of the pointy nail look!

x

Tuesday, 18 June 2013

Chalkboard Nails

 Today I have tried to create a Chalkboard nail effect! I saw it on the Caité website when I was researching for my review and nail of the day with their polish Kitten Heels.... I really liked the Idea of using the matte nail polish to create the chalk board look! so here is what I did and here is how it went!
 
 
I started by Using the Rimmel 60 seconds black nail polish in Black Out... I have to admit it does not dry in 60 seconds although that being said it is pretty old now and I did use 2 pretty thick coats as I wanted it really black! I do remember it drying faster when it was new and thinner!
 
 
Once the Black had dried I put some nail polish on a napkin and used the flat end of a pin to dot dots on to my nails, as I do not have a dotter! I often use a hair pin but I did this a couple of days before and it did not give the desired look I was after, it was too thick and a bit messy! The flat end of a pin, in my opinion, is much more successful! I then used a different colour nail polish and a different pattern of dots on each finger! I wiped the remaining nail polish off the pin end after each nail so I could re-use the same pin and not contaminate the colour! I waited about an hour between putting on the black and dotting on the dots, I had a lot of time to kill so an hour was convenient for me but you don't have to wait that long!
 
 
So for this look I used....
Barry M Matt White 66 on my thumb and did a dotted swirl
Models Own Grape Juice on my pointer finger with a dotted line
Models Own Jade Stone on my middle finger with half a arch
Barry M Gelly Grapefruit 311 on my ring finger in a dotted heart
Ciaté Ferris Wheel on my little finger with a C shape and a dot in the middle 
I chose these colours because most of them are a pastel or pale colour and I think this adds to the chalkboard effect!
 
 
Finally I painted the matte coat, Rimmel Matte Finish Mattifying Topcoat, I would recommend leaving as much time as possible between the application of the dots and the top coat as on a couple of my finger the polish bled into the black when I applied it. As for the nail polish on my shin, I don't use a cotton bud in nail polish remover as I always make a MASSIVE mess and smudge what I am doing! I just wait till Its bone dry then go at it with soap and water and a nail brush or it quite easily picks off the skin!
 
The first time I did this I made it a but more schooly with a division sign and a addition sign and I didn't use the dots, I just used solid lines.... it was more fun but it didn't look as good. I prefer the dotted look personally! Let me know what you think and if you like my posts then subscribe to my blog with Google plus!
 
X

Thursday, 13 June 2013

NOTD Ciaté in Kitten Heels and Review

Todays nail of the day is a nail varnish I got given as a gift from a friend who did a internship with this nail polish company! I had never heard of this product before so it was nice to try out something completely new! The Ciaté nail varnish bottle is very pretty, maybe one of the nicest bottles I have come across with the pretty bow on the bottle! It contains 13.5ml so you do get quite a lot of nail varnish. The bottle is also a nice curved shape! To buy this nail varnish off the Ciaté website it costs £9 which I think is quite expensive, but I think it is a really pretty colour and iv had it on for two days now and it has not chipped! That being said I am wearing my Seche Vite top coat so that could have helped!
 
 
The colour of this nail Varnish is really nice, it is red with a gold pearlescent highlight which shimmers in the light. Its it more clear in the pictures of the bottle but is also visible on the nail when you move in the light. I have applied two coats in this picture I think I could have applied a third coat to give it a slightly more opaque feel as I think it is very slightly transparent. I do really like this as I have already said, I have been wearing it as an everyday colour but I think that this colour is maybe a slightly more special colour, which I think ill save for if I go out somewhere nice or if I get a bit of a tan as I'm feeling very pale in this dreary British weather!
 
 
I do think that this nail varnish is slightly expensive but if I saw them in an offer I would definitely buy some! I have got 2 more colours to try so I will see how I get on with them and if I need to apply more than 2 coats. I would recommend this nail varnish if you saw I would say pick it up because even though its slightly transparent it is very bright! And I really really love the branding and bow on the bottle! For me branding and image of a product it very important and I like what I see here!


I had a look at the Ciaté nail varnish web site and twitter and they are based in London and they look to be quite a young fun company! They started the caviar manicure so they look to be quite a fun, young and upcoming, I would watch out for them as I think they have lots more fun things to come!
 
X

Friday, 26 April 2013

NOTD with Models Own scented

So since I tried out the models own scented Strawberry Tart Iv been wanting to get another one. I really like the look of the pastel purple in Grape Juice and have been lusting after it for ages now! Lucky for me pay day has arrived to today I went and picked it up! 

It smells amazing! I didn't think I'd say it but it smells even better than the Strawberry Tart! The smell reminds me of children's shampoo! I know its strange but its really nice.... I know deep down we all wish we could still use the shampoo out of the colourful bottles shaped like fish and splash about with them in the bath.... 

.... anyway back to the point! As always I find models own nail varnishes get better the longer you have them, you can't really tell because I have added a pretty spotty design (if I do say so myself) that even with 2 coats I found it quite translucent in places but this does not put me off as the varnishes tend to stay nice and thin in the bottles for a long time. 


I started by painting my nails with a base coat, then painted on 2 coats of the Grape Juice.Then for this design I just used a hair slide as I do not have a doter, although I should invest, to make a line of dots across my nail! It was really fast and only took a couple of minuets. I started with the Strawberry Tart by models own then for the second line used Barry M Gelly shine in Grapefruit 311.


I didn't use different sized 'doters' to do the different size dots, I just used the back of the hair slide at a slanty angle for the bigger dots so a larger surface area was covering my nail and I used just the tip for the smaller dots so a smaller surface area was touching the nail. I also only dipped once on the smaller dots and dipped into the colour every time for the larger dots.


To finish it off I applied a coat of my super fast drying super shine Seche Vite top coat! you can still 100% smell the grape scent through the top coat, although you can't small the strawberry as the Grape does overpower it but that is what I wanted!


Sorry about the slight mess around the edges of my nails it always look much worse in the photos than in real life! I hope you like this look and if you haven't yet I recommend you try the scented colours out! When I got these today they where on buy on get one half price in boots! I hope you have a nice weekend! Let me know if you try this or something similar out!

X

Thursday, 18 April 2013

Prom Nails Jade Models Own and Barry M

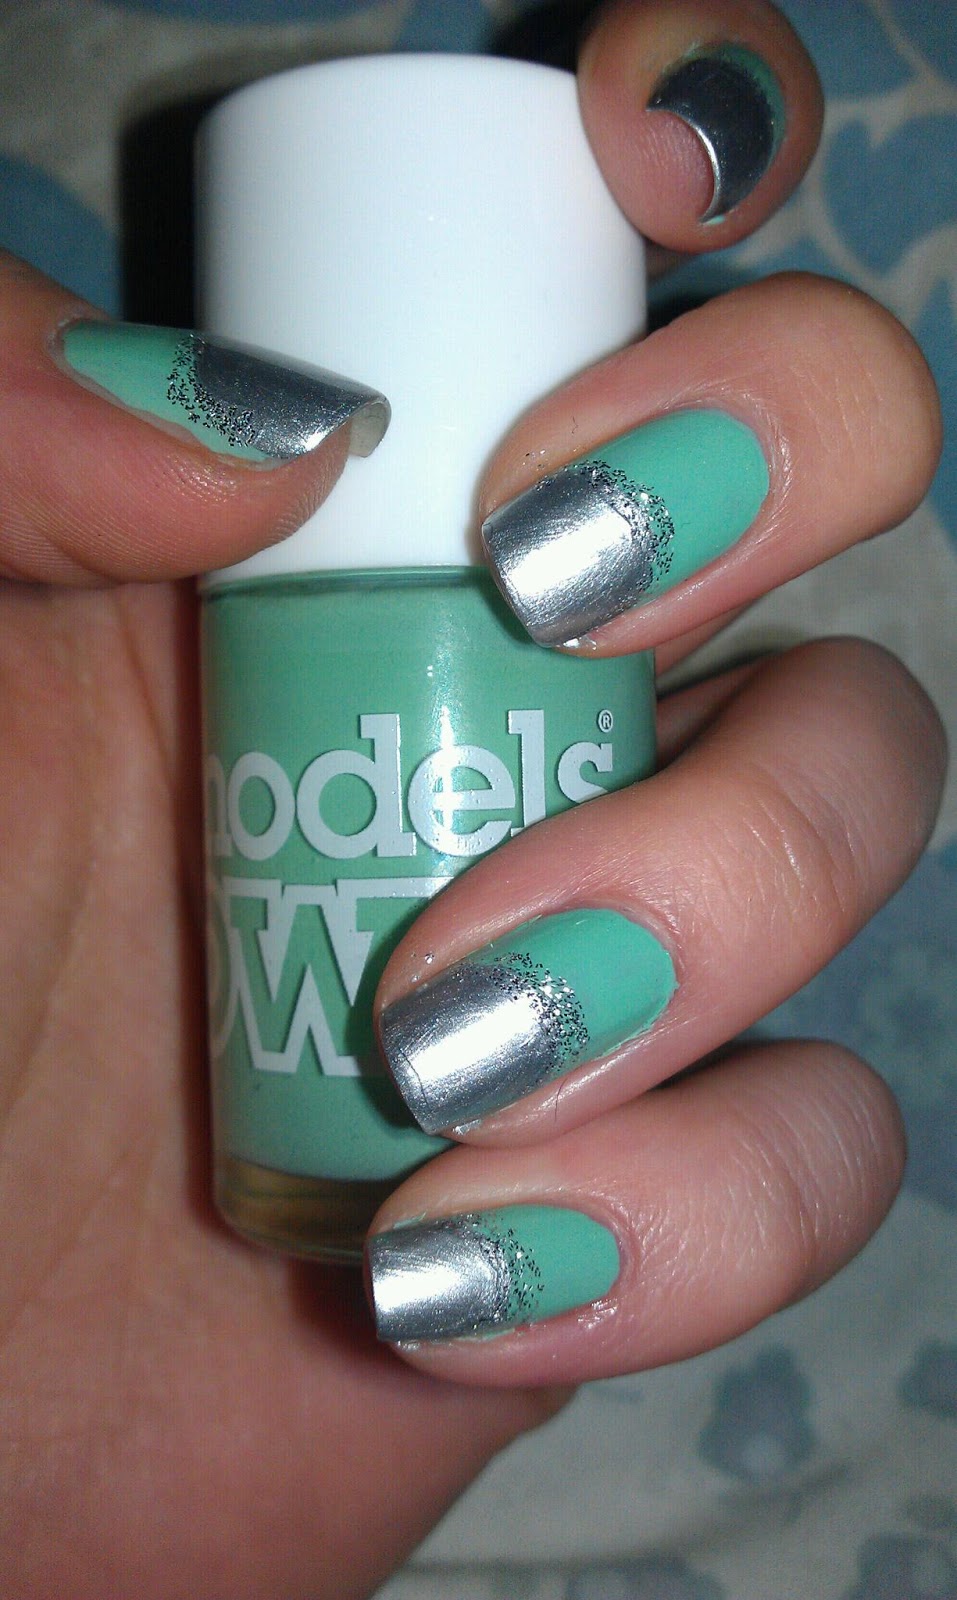
So I want to start a prom series ready for all the Proms coming up soon!.....So here is my first attempt! Its models own Jade Stone which I have had for a while and I LOVE.... the plain silver on the tips is Barry M Instant Nail Effects in 319 Foil, I have had this for quite some time now and I think they still do it, Its great you only need one coat and stays on really well. the sparkly silver is Barry M Limited Edition Effects which I picked up over a year ago in Boots its in silver glitter 149, Its quite an opaque glitter which you only need one coat!

The Final look!
So to get this look I started by priming my nail off with Sally Hanson (as always) then I applied one coat of the Jade stone! I know... It looks good for one coat! once it was fully dry I painted the bottom half of my nail with the Foil colour, just one coat again. I painted it with a curve around my nail, when doing this try to imitate the shape of your cuticle. Once that was fully dry I painted the glitter on the line, this covered any imperfections, I did not use and special brushes just the normal nail varnish brushes. I finished it off with the Seche Vite top coat with is super fast drying, Hi Shine and its really long lasting! 

Foil and Silver Glitter

I thought that this nail design was a bit of a twist on a French manicure which is a bit more special for an occasion like a prom! I chose to use the Jade but you could change the colour to any other for instance a pink would look really nice! I know a lot of girls do like a pink Prom dress!

Let me know what you think if you try this design out or if you use it for your prom or any other special occasion and I will continue with the prom series! Also if you have any requests for a colour scheme or design leave a comment and I will try my best to do them!
Jade Stone
I hope you have enjoyed this and follow me for me exciting designs!

X

Sunday, 14 April 2013

NOTD Black and Pink with Seche Vite

Recently one of my friends recommended that I try the topcoat by Seche Vite, it is so fast drying and super shine I can't believe how good it is! It is also meant to be super durable, it is blended to make all of the nail varnish layers bond together for the super durable effect. I bought it off eBay for £7.95 plus £1.00 postage and packaging! It is 100% worth the money! It arrived the next day and came with a free gift of Swarovski crystals. I have used them in this design for my flower centres! I bough it from ELM Beauty Ltd, I will post the link below!

http://www.ebay.co.uk/itm/SECHE-VITE-FAST-DRY-TOP-COAT-14ML-FREE-GIFT-/251178206506?_trksid=p5197.m1992&_trkparms=aid%3D111000%26algo%3DREC.CURRENT%26ao%3D1%26asc%3D14%26meid%3D6963419847275294887%26pid%3D100015%26prg%3D1006%26rk%3D1%26sd%3D251178206506%26


For this design I painted my nails with Sally Hansen hard as nails, then 2 coats of Rimmel 60 seconds in 800 black out (I have had this for ages) then I used my models own scented strawberry tart to dot on flowers but putting 5 small dots close together, using an orange stick. I then put a dot of the hard as nails in the centre of each flower and picked up the beautiful crystals with the orange stick and placed them onto the nail. Once it was dry I put a nice fairly thick coat of the Seche Vite dry fast top coat on and within 2 minutes it was completely dry!

TOP TIP: When dotting the flowers I placed a blob of the nail varnish I was using onto a piece of paper, as soon as the colour you are dotting starts to dry out and thicken get a new blob of the colour. If you do not then you may end up with lines of the nail varnish 'stringing' across your base coat.

I hope you have all had a good Sunday! I'm starting to feel much better after hitting my head! It's taken long enough!

X

close up of nails


Friday, 12 April 2013

NOTD Matte Pink and Coral Fade with Flowers

I am still bed bound so I decided to play about and try and sponge a nail design! I have never tried this before but after a bit of practice I found a way that worked for me! This was to firstly use a base coat, tape up around the edge of my nails with selotape which didn't take as long as I thought it would,  then to paint my nails with the lightest nail varnish colour, I have used models own scented strawberry tart. After it has dried paint onto a sponge your darkest colour, I have used models own, coral reef, then directly underneath the lighter colour you used to paint your whole nail with, dab this onto the nail with the sponge I tried rolling it side to side but I found dabbing it gave the best result.
Final Design 
Once the nail varnish had dried I put a blob of nail varnish onto a plastic bag and using a hair grip to make dots I dotted 5 small dots together on the nail to make a flower. I have randomly placed these onto the nail, using alternate colours on the opposite colours. I then used Models own Fuzzy Peach to create the centre of the flowers. I finished with Rimmel Matte Top Coat to seal the design in.
Tape to avoid mess
Finally I removed the tape when it was dry and went around my finger with some nail varnish remover and a cotton bud! This is quite a time consuming method but it does tidy it up A LOT!! The selotape did a god job but it doesn't cover all the exposed skin! I did like this technique of sponging but in the future I would only use it if I was using more than 2 colours. I feel that the clear nail polish technique of dabbing the 2 colours together is quicker, easier and more effective.
sponge and plastic bag for mess and dotting
One really good thing about this is even though I have used the top coat I can still smell the strawberry scented nail varnish! I think this is really cool and when I first used it I didn't apply top coat as I thought it would ruin it! Its not as powerfull as it was when I didn't use a top coat but I can still 100% smell it!


Strawberry Tart, Coral Reef, Fuzzy Peach, Matte Top Coat


X

Sunday, 7 April 2013

NOTD with models own

Today I am wearing models own scented nail varnish in strawberry tart! I'm not much of a pink person but I like this because its a very slightly peachy pink rather than sickly pink! It smells beautiful just like a strawberry tart... I don't know if I really see the point of a smelly nail varnish but... I like it for the novilty value! And I think for the first day you have a strawberry aroma following you around which I quite enjoy! Iv put 3 coats of here but only because I smudged the second coat, 2 would have been just fine!
Enjoy this sunny Sunday, I know I will with my pretty pink nails!
Follow for more exciting posts!
X