Showing posts with label models own. Show all posts

Thursday, 15 May 2014

NOTD models own Turquoise Gloss HyperGel

This is just a quick post as I have had loads of comments on how nice this colour is! All I really wanted to do was share the love a bit!

As it says in the title it is one on models own from the HyperGel range (no UV required) in the shade of .... Turquoise Gloss! I got it from the Shepherd's Bush Westfield shopping center in a 6 bottles for £20 deal! This was the only HyperGel polish bought, and the only one I have, and I love it! 

I have had it on for 4 days now chip free! The colour is much more vibrant when it's applied than the colour it shows on the bottle which I love! I will 100% be buying more from this HyperGel range in the future! And would 100% recommend it! 

Xx

Monday, 6 January 2014

NOTD to brighten up a Monday

Just a quick post to brighten up the dreaded back to work Monday! And I mean how can you not have a smile on your face with the models own Southern Lights!

I think I would have to rate this as my favourite glittery nail polish to date! I just applied 2 coats on to my nail which I had primed with Sally Hansen base coat then 2 coats of the models own Southern Lights and I finished it off with 2 coats of my Seche Vite top coat!

My boyfriend bought me this nail varnish for Christmas and he did a good job!

X


Wednesday, 26 June 2013

Pointy Nails! NOTD

So I decided to go for a change from my normal square shaped nail! 
I don't really like the rounded nail shape on my nails and wanted to go for something a bit different! I have seen a lot of the 'Rihanna' style nails but I haven't seen it on real nails only acrylics.... But while at work the other day I accidentally broke a nail into this shape, which is ironically the worst shaped nail I have now, so I thought I would give it a go and give them all a re-shape! 

So here it is...


So here they are with the Leighton Denny nail polish in Embellish Me, this is the first time I have tryed this nail polish, my mum was given it as a gift and I tried it out, I love everything about it, the colour itself, the depth of colour, how pigmented it is and how well it stayed on my nail, I don't know where it is from or how much it cost but even if it was expensive I would 100% buy another one! 


If you have tried the Leighton Denny range out let me know what you think of some of the other colour available!


I think the pictured don't really do my nails justice for how long they are, but here they are with models own in fuzzy peach. If you want to re-create this look then I recommend taking nail clippers to the corners of your  nails then filling them one side at a time to create a point!


This is the nail polish I am wearing today! I re-shaped them from the original photos to give them even more of a point. To do this filled my nails right down to the bottom corners as there was a bit of re-growth. they seem to look a bit shorter even though I didn't take any off the length but they do look more pointed, here I am wearing models own in Jade Stone, I always bang on about this nail varnish as it is one of my favorites!

As i said before let me know if you try this out and what you think of the pointy nail look!

x

Monday, 27 May 2013

NOTD with Models Own

Just a quick post for an alternative colour way for the half and half nails! I really like this look I think its really pretty for the summer and its a slightly diffirent colour combination! Iv used models own scented Grape Juice and the normal Jade Stone!
I really love these nail varnishes and I have a great grapey smell!
X

Friday, 24 May 2013

Pink Half and Half Nails! How To...

This is just a really quick post on how I did this half and half nail look! Nice and simple and quick for the bank holiday weekend and nice and summery! You can do this with any two colours! Iv chosen two pinks as you can see!

To do this I started with the lightest colour my pale pink and painted the whole nail (models own scented), I useded the lightest colour first so that the bottom colour will not show through any of the too colour when you apply it! Once the bottom colour on the whole of the nail is touch dry carefully apply the second colour, in my case the dark pink (barry m gellies) starting at the edge of the nail in one long smooth stroke then working my way towards the center on the nail. If you are careful and rest your hand on a surface it is easy to keep the line straight and only paint it on half of the nail. Finish buy applying a top coat!

I hope you like this quick and easy look! Some other nice combos might be lilac and jade, blue and yellow or a brighter green and a darker grey! You could also put some glitter on one of the sides! Because I do love glitter!

Have a nice bank holiday weekend I know I will!

X

Sunday, 28 April 2013

NOTD Neon Green with Black and White

So I bought the models own Matt nail varnish in Toxic Apple a couple of days ago and wanted to try it out! as the weather is a bit gloomy I didn't really fancy having full on BRIGHT green nails so this morning I saw a design on twitter which inspired me to do this! 

Anyway back to the nail polish its self, its a really nice colour, very neon but I don't rate it for the matt qualities. I was a bit unsure on having just a nail polish which was Matt as you only have each individual colour that is matt rather than being able to pick what colour you want. I would recommend getting the Rimmel Matt Top coat if you want a matt colour but if your looking for something neon then this is a great choice! The other colours in the range also look really good too! It might have looked more neon with 2 coats but I only used one each time as I didn't want to have a huge layer of nail varnish on my nails!


The finished look

I started by trimming my nails then shaping them and putting some base coat on. my nails where much longer but the edges were very weak and when I touched anything they would bend and it would chip my nail varnish so even though they looked nice it was time for a trim!

Prep the Nails
Next I painted my nails a combination of colour using Rimmel 60 second 800 Black Out, The Colour Institute in French white (it was a white I got in a French manicure set) and then Models Own in toxic apple. I just did one coat and I didn't paint them in an order I just did it randomly. 

First Coat of Nail Colours
Next I painted 3/4 of the nail in a different colour to the colour already on my nail. So on my green nail I painted it with the black starting 1/4 of the way down my nail following my cuticle line and leaving a gap around the edge. If I wanted to do the green on top of the black I had to first paint it with the white then paint the neon green over when white once it had dried! 

The Finished Look

This was super easy and really quick! I then added the Seche Vite Top Coat! I hope you like this look! if you try it out let me know what you think!

X

Friday, 26 April 2013

NOTD with Models Own scented

So since I tried out the models own scented Strawberry Tart Iv been wanting to get another one. I really like the look of the pastel purple in Grape Juice and have been lusting after it for ages now! Lucky for me pay day has arrived to today I went and picked it up! 

It smells amazing! I didn't think I'd say it but it smells even better than the Strawberry Tart! The smell reminds me of children's shampoo! I know its strange but its really nice.... I know deep down we all wish we could still use the shampoo out of the colourful bottles shaped like fish and splash about with them in the bath.... 

.... anyway back to the point! As always I find models own nail varnishes get better the longer you have them, you can't really tell because I have added a pretty spotty design (if I do say so myself) that even with 2 coats I found it quite translucent in places but this does not put me off as the varnishes tend to stay nice and thin in the bottles for a long time. 


I started by painting my nails with a base coat, then painted on 2 coats of the Grape Juice.Then for this design I just used a hair slide as I do not have a doter, although I should invest, to make a line of dots across my nail! It was really fast and only took a couple of minuets. I started with the Strawberry Tart by models own then for the second line used Barry M Gelly shine in Grapefruit 311.


I didn't use different sized 'doters' to do the different size dots, I just used the back of the hair slide at a slanty angle for the bigger dots so a larger surface area was covering my nail and I used just the tip for the smaller dots so a smaller surface area was touching the nail. I also only dipped once on the smaller dots and dipped into the colour every time for the larger dots.


To finish it off I applied a coat of my super fast drying super shine Seche Vite top coat! you can still 100% smell the grape scent through the top coat, although you can't small the strawberry as the Grape does overpower it but that is what I wanted!


Sorry about the slight mess around the edges of my nails it always look much worse in the photos than in real life! I hope you like this look and if you haven't yet I recommend you try the scented colours out! When I got these today they where on buy on get one half price in boots! I hope you have a nice weekend! Let me know if you try this or something similar out!

X

Thursday, 18 April 2013

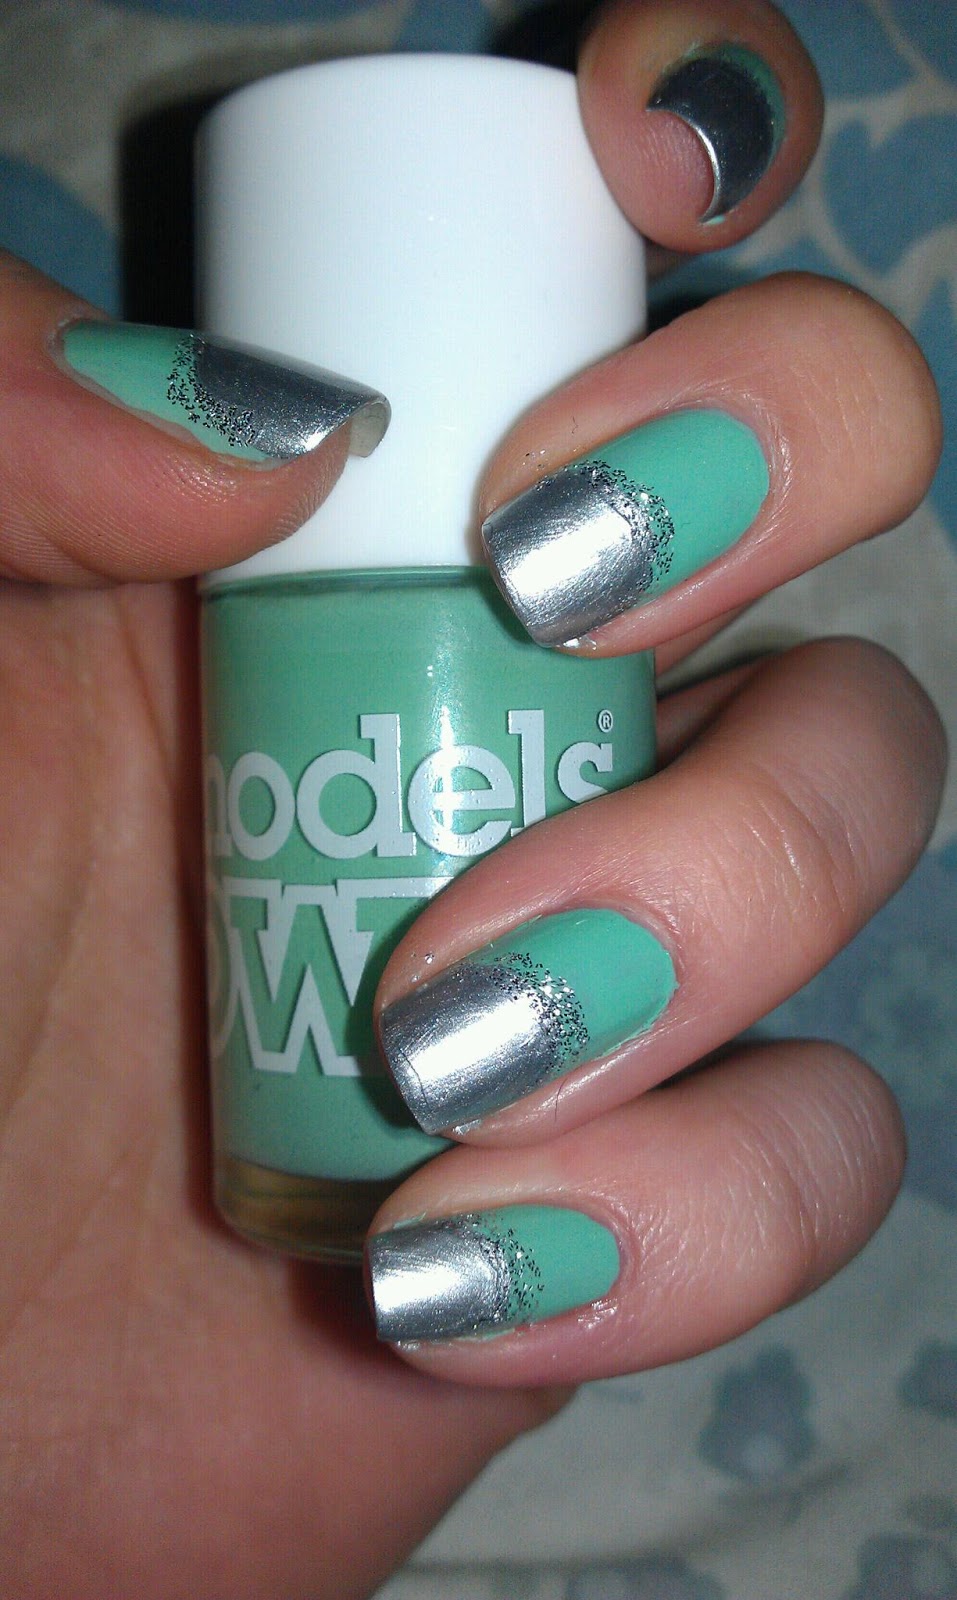
Prom Nails Jade Models Own and Barry M

So I want to start a prom series ready for all the Proms coming up soon!.....So here is my first attempt! Its models own Jade Stone which I have had for a while and I LOVE.... the plain silver on the tips is Barry M Instant Nail Effects in 319 Foil, I have had this for quite some time now and I think they still do it, Its great you only need one coat and stays on really well. the sparkly silver is Barry M Limited Edition Effects which I picked up over a year ago in Boots its in silver glitter 149, Its quite an opaque glitter which you only need one coat!

The Final look!
So to get this look I started by priming my nail off with Sally Hanson (as always) then I applied one coat of the Jade stone! I know... It looks good for one coat! once it was fully dry I painted the bottom half of my nail with the Foil colour, just one coat again. I painted it with a curve around my nail, when doing this try to imitate the shape of your cuticle. Once that was fully dry I painted the glitter on the line, this covered any imperfections, I did not use and special brushes just the normal nail varnish brushes. I finished it off with the Seche Vite top coat with is super fast drying, Hi Shine and its really long lasting! 

Foil and Silver Glitter

I thought that this nail design was a bit of a twist on a French manicure which is a bit more special for an occasion like a prom! I chose to use the Jade but you could change the colour to any other for instance a pink would look really nice! I know a lot of girls do like a pink Prom dress!

Let me know what you think if you try this design out or if you use it for your prom or any other special occasion and I will continue with the prom series! Also if you have any requests for a colour scheme or design leave a comment and I will try my best to do them!
Jade Stone
I hope you have enjoyed this and follow me for me exciting designs!

X

Sunday, 14 April 2013

NOTD Black and Pink with Seche Vite

Recently one of my friends recommended that I try the topcoat by Seche Vite, it is so fast drying and super shine I can't believe how good it is! It is also meant to be super durable, it is blended to make all of the nail varnish layers bond together for the super durable effect. I bought it off eBay for £7.95 plus £1.00 postage and packaging! It is 100% worth the money! It arrived the next day and came with a free gift of Swarovski crystals. I have used them in this design for my flower centres! I bough it from ELM Beauty Ltd, I will post the link below!

http://www.ebay.co.uk/itm/SECHE-VITE-FAST-DRY-TOP-COAT-14ML-FREE-GIFT-/251178206506?_trksid=p5197.m1992&_trkparms=aid%3D111000%26algo%3DREC.CURRENT%26ao%3D1%26asc%3D14%26meid%3D6963419847275294887%26pid%3D100015%26prg%3D1006%26rk%3D1%26sd%3D251178206506%26


For this design I painted my nails with Sally Hansen hard as nails, then 2 coats of Rimmel 60 seconds in 800 black out (I have had this for ages) then I used my models own scented strawberry tart to dot on flowers but putting 5 small dots close together, using an orange stick. I then put a dot of the hard as nails in the centre of each flower and picked up the beautiful crystals with the orange stick and placed them onto the nail. Once it was dry I put a nice fairly thick coat of the Seche Vite dry fast top coat on and within 2 minutes it was completely dry!

TOP TIP: When dotting the flowers I placed a blob of the nail varnish I was using onto a piece of paper, as soon as the colour you are dotting starts to dry out and thicken get a new blob of the colour. If you do not then you may end up with lines of the nail varnish 'stringing' across your base coat.

I hope you have all had a good Sunday! I'm starting to feel much better after hitting my head! It's taken long enough!

X

close up of nails


Friday, 12 April 2013

NOTD Matte Pink and Coral Fade with Flowers

I am still bed bound so I decided to play about and try and sponge a nail design! I have never tried this before but after a bit of practice I found a way that worked for me! This was to firstly use a base coat, tape up around the edge of my nails with selotape which didn't take as long as I thought it would,  then to paint my nails with the lightest nail varnish colour, I have used models own scented strawberry tart. After it has dried paint onto a sponge your darkest colour, I have used models own, coral reef, then directly underneath the lighter colour you used to paint your whole nail with, dab this onto the nail with the sponge I tried rolling it side to side but I found dabbing it gave the best result.
Final Design 
Once the nail varnish had dried I put a blob of nail varnish onto a plastic bag and using a hair grip to make dots I dotted 5 small dots together on the nail to make a flower. I have randomly placed these onto the nail, using alternate colours on the opposite colours. I then used Models own Fuzzy Peach to create the centre of the flowers. I finished with Rimmel Matte Top Coat to seal the design in.
Tape to avoid mess
Finally I removed the tape when it was dry and went around my finger with some nail varnish remover and a cotton bud! This is quite a time consuming method but it does tidy it up A LOT!! The selotape did a god job but it doesn't cover all the exposed skin! I did like this technique of sponging but in the future I would only use it if I was using more than 2 colours. I feel that the clear nail polish technique of dabbing the 2 colours together is quicker, easier and more effective.
sponge and plastic bag for mess and dotting
One really good thing about this is even though I have used the top coat I can still smell the strawberry scented nail varnish! I think this is really cool and when I first used it I didn't apply top coat as I thought it would ruin it! Its not as powerfull as it was when I didn't use a top coat but I can still 100% smell it!


Strawberry Tart, Coral Reef, Fuzzy Peach, Matte Top Coat


X

Sunday, 7 April 2013

NOTD with models own

Today I am wearing models own scented nail varnish in strawberry tart! I'm not much of a pink person but I like this because its a very slightly peachy pink rather than sickly pink! It smells beautiful just like a strawberry tart... I don't know if I really see the point of a smelly nail varnish but... I like it for the novilty value! And I think for the first day you have a strawberry aroma following you around which I quite enjoy! Iv put 3 coats of here but only because I smudged the second coat, 2 would have been just fine!
Enjoy this sunny Sunday, I know I will with my pretty pink nails!
Follow for more exciting posts!
X

Thursday, 21 March 2013

Rimmel London Matte finish

So I mentioned in my last post about a matte top coat that is my favourite! It is really fast drying which I love, iv tryed it out several times on several diffirent colours and it has looked good on them all! It deffiently works! I would 100% recommend this nail varnish! So this is called Rimmel London lycra pro Matte Finish up to 10 Days. To be honest I have never used a nail varnish which has lasted over 4 days without chipping but this top coat has lasted me at least 3 days without chipping everytime I have used it!
I preped my nails then painted them with base coat, then 2 coats of models own in fuzzy peach then I painted 2 coats of the top coat. I think it looks better with 2 coats and has a lovely smooth velvety finish!
In my pictures I have left my ring finger without the top coat so you can see the diffirence between the gloss and matte although I don't think it has come up to clearly in the picture!

X

Tuesday, 11 December 2012

Day 11 of Blogmas! My Free Moldels Own Varnish

Iv decided I actually LOVE the models own nail varnish range after using it and checking it all out online! Seems as iv been band from buying myself anything till after Christmas these are some of the first things I will run out and buy! One of the reasons I like these is because they are so big, you get so much for your money and these are really pigmented!

As this colour is only a sample it dosent have a name but it's just pretty much a shimmery glittery gold. This colour is a really pretty metallic gold!

I hope you enjoy it! And I hope it wears well and won't chip to fast at work! Here is the result!

My top tip is to paint your nails before you have a shower or bath, then when you are in the shower and your hands have been soaked gently rub around the edge of your nails and the nail varnish on your skin will just rub off!

X

Sunday, 9 December 2012

Day 9 of Blogmas Christmas Manicure

I hope you have all had a great weekend! I have had an amazing weekend, had a great day at work on Saturday followed by a lovely Christmas party and relaxing all day today! So keeping with the festive theme here is my Christmas manicure....
First I trimmed my natural nail, shaped them with the file, massaged some cuticle oil in, pushed them back and trimmed then buffed my nails so even out any uneven surfaces.
I started with my Sally Hanson nail varnish as a base coat, then I painted the tips of my nails with an white French tip colour I had. I do this free hand with the nail varnish brush, I start with one coat going vertically and once it is dry I put on a second coat horizontally to even out any lines. I wait for this to dry.
It doesn't have to be perfect as the glitter will help to hide any imperfections. I then put a thick layer of the glitter over my French tip! I have used my new models own Ibiza mix from the hedkandi range. I then wait for this to dry and finish with a top coat.
I have already had this nail varnish on for two days. It has lasted well I also think that glitter helps to prolong the tips as glitter is really hard to remove for your nails, it also disguises chips as it looks like pieces of glitter!
Please comment for any additional information or anything you would like me to try!

X

Tuesday, 4 December 2012

Day 4 of Blogmas! Ibiza Mix Nail Varnish

Hope everybody is having a good advent so far and is on top of there Christmas shopping! I got LOADS of my Christmas shopping done on my lunch today! Feeling much calmer about Christmas now and much more at ease! Working in retail I have a massive fear that Christmas will be upon me before I know it and there will be no presents or time left and ill have to get everyone a Topshop voucher! (even my dad)

Anyway..... Swiftly moving on..... I tried out my new models own Ibiza Mix nail varnish today... I really like the colour and I really like that the glitter is 'thin' so it isn't poking off my nail or catching on anything. I'm also a huge fan if the different size chunks, however I don't like how watery it is. I had to apply 2-3 thick coats to get this coverage. I find with glitters the longer you have them the better they get! I hope this turns out to be the same! I shall keep you updated...

I wish you all good luck in your Christmas shopping!

X

Saturday, 1 December 2012

Day 1 My Blogmas Theme

So I have had all day to think about what theme I will bog about over blogmas and iv decided that I am going to have newness as my theme! It can be anything from a new thing, new experience, new product, visiting a new place or meeting new people.
I have a new nail varnish/varnishes to show you that I got today on my lunch break when I voyaged down to Boots (can I go a single blog without mentioning Boots?) So I bought 2 Models Own nail varnishes £5 each the first one is from the Ice Cream Sundae range and called Jade Stone, I have been looking for a pastel green sort of colour and I decided on this one. The second one is from the Hed Kandi range called Ibiza Mix I have also been looking for a multi colour glitter that is not garish and has smaller and larger chunks and this seemed to be quiet a good choice and because I bought two Models Own products I got a free models own nail art kit!!! It comes with a free 10ml golden nail varnish and a nail pen/long brush. I wanted a gold nail varnish for the festive season so this one will be a good place to start!
What I bought
Here is picture of a swatch of the Jade stone. This is after one coat, this is a VERY pigmented nail varnish. I think these varnishes are quite runny, I think this is good as it dries quite fast. I will be applying a second coat in the morning just because I feel it would have a nicer finish but if I didn't have time to then I would be quite happy with just one coat! I used my Sally Hanson hard as nails as a base coat and ill show the Ibiza mix when I use it!

I hope everyone else enjoys trying out new things in December and enjoys my new experiences for Blogmas!!!!

Swatch of Jade Stone
X