So today my mum asked me to do a French manicure on her nails.... as she made me a cuppa tea! The cheek! Any way as I love doing nails and can only do my own a couple of times a week I took her up on the offer! I took step by step pictures to show how I did it to make it as clear as possible! She already has the Sally Hansen hard as nails manicure set so that's what I used, I don't know where it was from or how much it cost but I think it was probably from boots or superdrug and wouldn't have been more than £10. I think that any clear or sheer nudie pink will also do a great job! I recently got the Barry M white and I think it does a great job! and its only £3.99!
 |
| Pre Manicure |
This was the nails pre manicure! They are quite uneven with the nails being different shapes, some being round and some being square!
 |
| Prepared with Base Coat |
So I prepared the nails by filing them all into a square shape and applying the Sally Hansen as Hard as Nails strengthener as a base coat. This did not come in the kit but I wanted to use a base coat first and this one is one I like! My mums little finger nail was as short as it could be so I just smoothed it off with the nail file and left it short, as her other nails are not too long and it is only her little finger nail I don't think it matters to much as its not a focal nail and we can just paint a tip onto it later! If it was the index finger I would have thought about trimming the other nails down more!
 |
| White Tips |
Next I painted the white tips onto the bottoms of the nails, this kit came with the tapes if you do not have a steady hand to do it yourself! I always free hand the white tips as I personally find it easier to do and I do not like the strips as I tend to find they leave a sticky mess on your nails but my mum always uses them when she does her nails her self and she finds them really good! I think its a personal taste thing! I paint the white tips by painting in a sideways motion, sort or how you would line your eye, I start on one corner of the nail and sweep the brush towards the centre and take it as far across the nail as possible. When it cant go any further I dip the brush back into the polish and start from the other side to they meet in the middle. If you make a mess here, like I have, its not the end of the world you can clear it up later with a cotton bud and some nail varnish remover or soak your hands in some warm soapy water for 10 minutes when all the nail varnish has dried and it will just rub away with a nail brush!
 |
| Nude Over Coat |
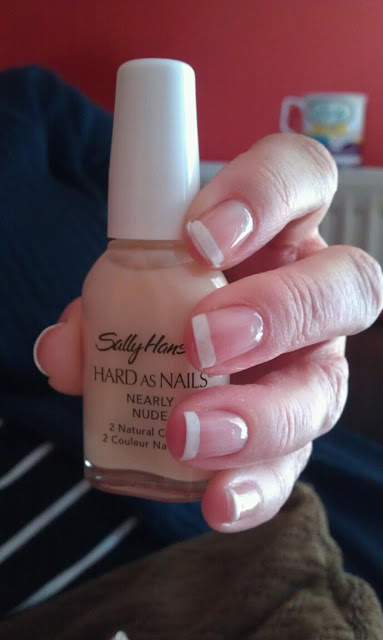
Next I applied 2 coats of the nearly nude OVER the whole nail including the white tip, this gives a nicer finish and the white isn't so garish. When doing this manicure I did not have to wait very long for the colours to dry at all. The most time I probably wait between coats was between the white tips and applying this nearly nude. Which was about 5 minuets and it was only that long as it took me a while to do all the tips!
 |
| The Finished Look |
Here is the final look for the French tips! as you can see by painting a tip onto the little finger nail you can't really tell that there isn't a nail there! I applied the Seche Vite top coat so it would dry super fast and shiny! and its as simple as that! I hope you enjoy the rest of this bank holiday! the weather is meant to be really nice tomorrow so don't forget to apply sun cream!
X


